
Capturing Autumn's Canvas with the Magic of CPL Filters
As the leaves shift into a magnificent mosaic of reds, oranges, and yellows, fall provides an unequalled opportunity for photographers to capture nature’s splendour. However, the rich colours and dynamic landscapes can provide distinct issues, such as glare, reflections, and uneven lighting. Enter the Circular Polariser (CPL) filter, a must-have tool that not only improves the aesthetic quality of your images but also helps you to handle these issues with ease. In this post, we’ll look at how CPL filters work, why they’re important for photograph during autumn, and how to use them most effectively during this captivating season.
A circular polariser is a specialised filter made up of two layers of glass: a polarising filter and a spinning polarising element. When light bounces off surfaces, it may become polarised, resulting in undesired glare and reflections. The CPL filter addresses this by selectively filtering out polarised light, producing crisper visuals with higher colour saturation and contrast. In essence, the CPL filter works by allowing you to adjust the quantity of light that enters your lens. By moving the filter’s outer ring, you may change the polarisation effect, increasing the blueness of the sky, minimising glare from water surfaces, and boosting the overall quality of your images. This functionality is especially useful in autumn when photographing landscapes with vivid foliage, reflective water bodies, and dynamic skies.

Autumn is a season of transformation. As the chlorophyll fades, the colours of the leaves appear in stunning displays, making this an ideal period for landscape photography. A CPL filter can intensify these colours in a variety of ways.
- Enhanced Colour Saturation: With a CPL filter, the rich hues of autumn foliage become even more spectacular. The filter reduces glare and reflections off leaves, allowing their true colours to show through, producing beautiful photographs that capture the soul of the season.
- Contrasting Skies: A CPL filter can accentuate the autumn sky, which is often ornamented with stunning cloud patterns. Rotating the filter allows photographers to enhance the blues in the sky, producing a dramatic contrast against the warm colours of the foliage and giving depth and dimension to the composition.
- Reflections on Water: In autumn, tranquil lakes and rivers reflect the rich colours of the surrounding foliage. A CPL filter reduces reflections on water surfaces, allowing for magnificent compositions in which the colours reflect without interruption.
Useful Tips for Maximising CPL Filters during autumn:
- Choose the Right Time: The golden hours, just after sunrise and before sunset, provide the most attractive light for photograph during autumn. During these times, the sun’s low angle increases colour saturation and casts dynamic shadows. Using a CPL filter during these hours can help to enrich your photographs.
- Rotate for Effect: The brilliance of a CPL filter stems from its adaptability. As you arrange your photo, spin the filter to see how it affects the colour and glare. Experimenting with rotation can produce dramatic changes in the image, revealing colourful details in the foliage and improving the clarity of the sky.
- Watch Your Angles: The efficiency of a CPL filter is greatly determined on the angle of light. Position yourself at a 90-degree angle to the light source for the best effects, allowing the filter to reduce reflections and enhance colours. When photographing autumn scenery, consider your position in relation to the sun.
- Use a Tripod: In low-light settings, like as gloomy days or shaded regions, a CPL filter can restrict the amount of light entering the lens, requiring longer exposure times. Using a tripod can assist stabilise your camera and reduce motion blur, resulting in clean, detailed photographs.
- Consider Composition: Autumn provides numerous compositional opportunities, from winding walks covered with fallen leaves to towering trees bursting with colour. When employing a CPL filter, think about how the reduced reflections and increased colours would suit your composition. Use leading lines and foreground items to pull the viewer’s attention into the scene.
- Post-Processing Techniques: While a CPL filter can considerably improve your photographs right out of the camera, post-processing can make them even more beautiful. Adjusting saturation, contrast, and sharpness in post-production can enhance the filter’s effects, yielding magnificent final photographs.

As autumn arrives, the countryside transforms into a canvas of spectacular colours and textures, beckoning photographers to capture its magnificence. A Circular Polariser filter not only enhances these natural wonders, but it also helps photographers overcome glare and uneven lighting. Photographers can improve their photograph by learning how CPL filters work and adopting the advice suggested.
Finally, the ability to transmit emotions and tell tales through photographs is what defines photography as an art. The CPL filter is an essential instrument in this endeavour, allowing photographers to immerse their audience in the vibrant of autumn’s colours, reflections, and atmospheres. Embrace the season, grab your CPL filter, and go on a photographic tour to celebrate the ephemeral beauty of fall.

Phi and the Pursuit of Perfection in Visual Arts
The appeal of beauty has captivated humanity for generations, with countless minds wondering what makes something truly pleasing to the eye. Among the several hypotheses that have emerged, one stands out: the Golden Ratio. From the vast cathedrals of the Renaissance to the delicate balance of elements in a photograph, the Golden Ratio has inspired painters, architects, and photographers in their search of aesthetic perfection. This seemingly miraculous proportion, based on ancient mathematics, can be seen in nature, art, and the human body, serving as a link between the natural world and human creativity. Understanding the Golden Ratio in photography is like to discovering a hidden key to visual balance.
The Golden Ratio, represented by the Greek symbol φ (phi), has a value of around 1.618. The concept originated with ancient Greek mathematicians like as Euclid, who originally articulated it in his seminal work “Elements” approximately 300 BCE. However, Pythagoras established the foundation for its geometric study. The ratio happens when a line is divided into two pieces so that the longer part divided by the smaller part equals the total length divided by the longer part. This proportion was first detected in geometric shapes such as the pentagon and decagon, but its actual significance became clear when ancient architects began incorporating it into their works, particularly the Parthenon in Athens.
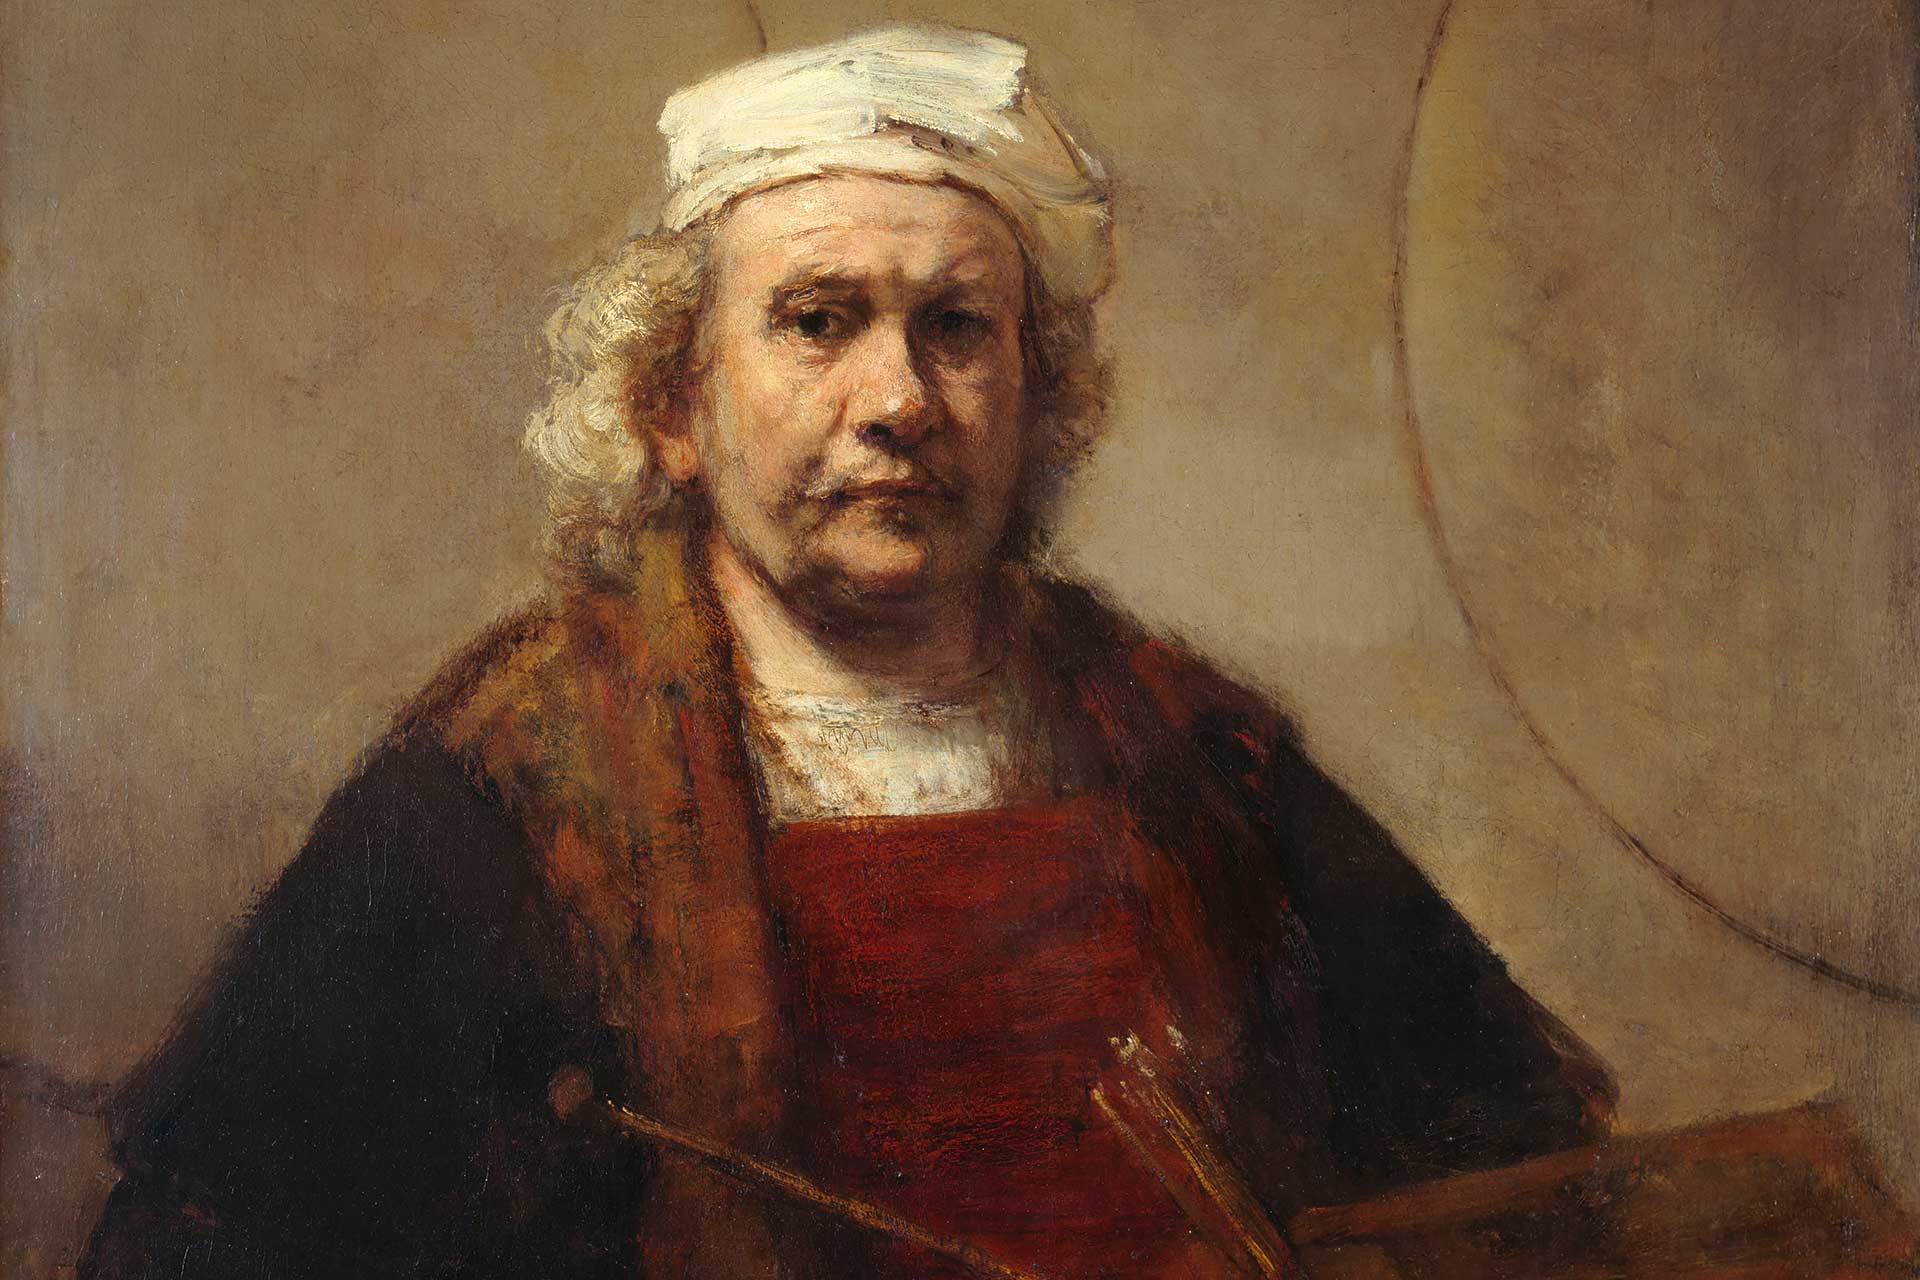
The Renaissance, an era of renewed interest in classical knowledge, propelled the Golden Ratio to the forefront of artistic development. Figures like Leonardo da Vinci, Michelangelo, and Albrecht Dürer embraced the ratio and included it into the compositions of their works. The mathematical elegance of φ transcended its geometric beginnings, becoming a symbol of beautiful harmony and heavenly proportion in art. During this age, painters were captivated by proportion and symmetry, eager to discover the mathematical rules that govern beauty. Leonardo da Vinci’s classic artwork Vitruvian Man exemplifies how the Golden Ratio was applied to human anatomy. This artwork, which depicts a man inscribed in both a circle and a square, represents the Renaissance’s effort to explain the universe via mathematics and the human form. The proportions of the human body, as seen in this artwork, demonstrate the divine harmony inherent in nature.
Leonardo da Vinci’s picture The Last Supper displays the use of the Golden Ratio. Da Vinci methodically planned the construction of this renowned work, ensuring that important aspects of the narrative—the location of Christ and the apostles—were contained within areas established by the Golden Ratio. Similarly, Michelangelo used these concepts in his architectural designs, notably as the construction of St. Peter’s Basilica, which created spatial harmony by a careful application of phi.
This convergence of art and mathematics throughout the Renaissance was more than just a technical exercise. It was part of a larger intellectual movement that saw beauty as an expression of divine order. By sticking to these proportions, painters believed they were creating works that reflected the perfection of God’s creation, providing their audience with an experience of artistic transcendence.

While the Golden Ratio’s influence is frequently associated with big artistic movements from the past, its relevance has persisted into the current era, particularly in the art of photography. Photographers, like Renaissance artists, strive for images that are balanced, appealing, and engaging. In this pursuit, many people use the Golden Ratio to guide their compositions.
In photography, the Golden Ratio is represented by the Phi Grid and the Fibonacci Spiral. The Phi Grid is similar to the rule of thirds but more precise, dividing the frame into sections that follow the Golden Ratio. Placing subjects at these intersections produces a sense of natural equilibrium, guiding the viewer’s eye through the image in a planned yet simple manner. Unlike the rule of thirds, which divides an image into equal portions, the Golden Ratio’s asymmetry creates a subtle tension that heightens visual interest without overpowering the audience.
In contrast, the Fibonacci Spiral spirals outward from the smallest component of the image, increasing in size while keeping to the Golden Ratio’s proportions. Photographers utilise this spiral as a guide to arrange significant elements of their images along its path, resulting in a composition that organically leads the eye through the scene. This approach is especially useful in landscape photography, as natural components such as rivers, trees, or clouds can be placed to follow the spiral’s curve, creating a harmonic and full image.
Many of the world’s most prominent photographers have employed the Golden Ratio concepts in their work, either consciously or unconsciously. Henri Cartier-Bresson, often considered as the father of contemporary photojournalism, is one of these figures. Cartier-Bresson, famous for his “decisive moment” method, captured short moments that express tremendous human emotion and storytelling. While his images appear to be spontaneous, a close examination reveals that many of them are based on the Golden Ratio. The balance and flow of his frames create a rhythm that draws the viewer in while gently leading the eye across the image.
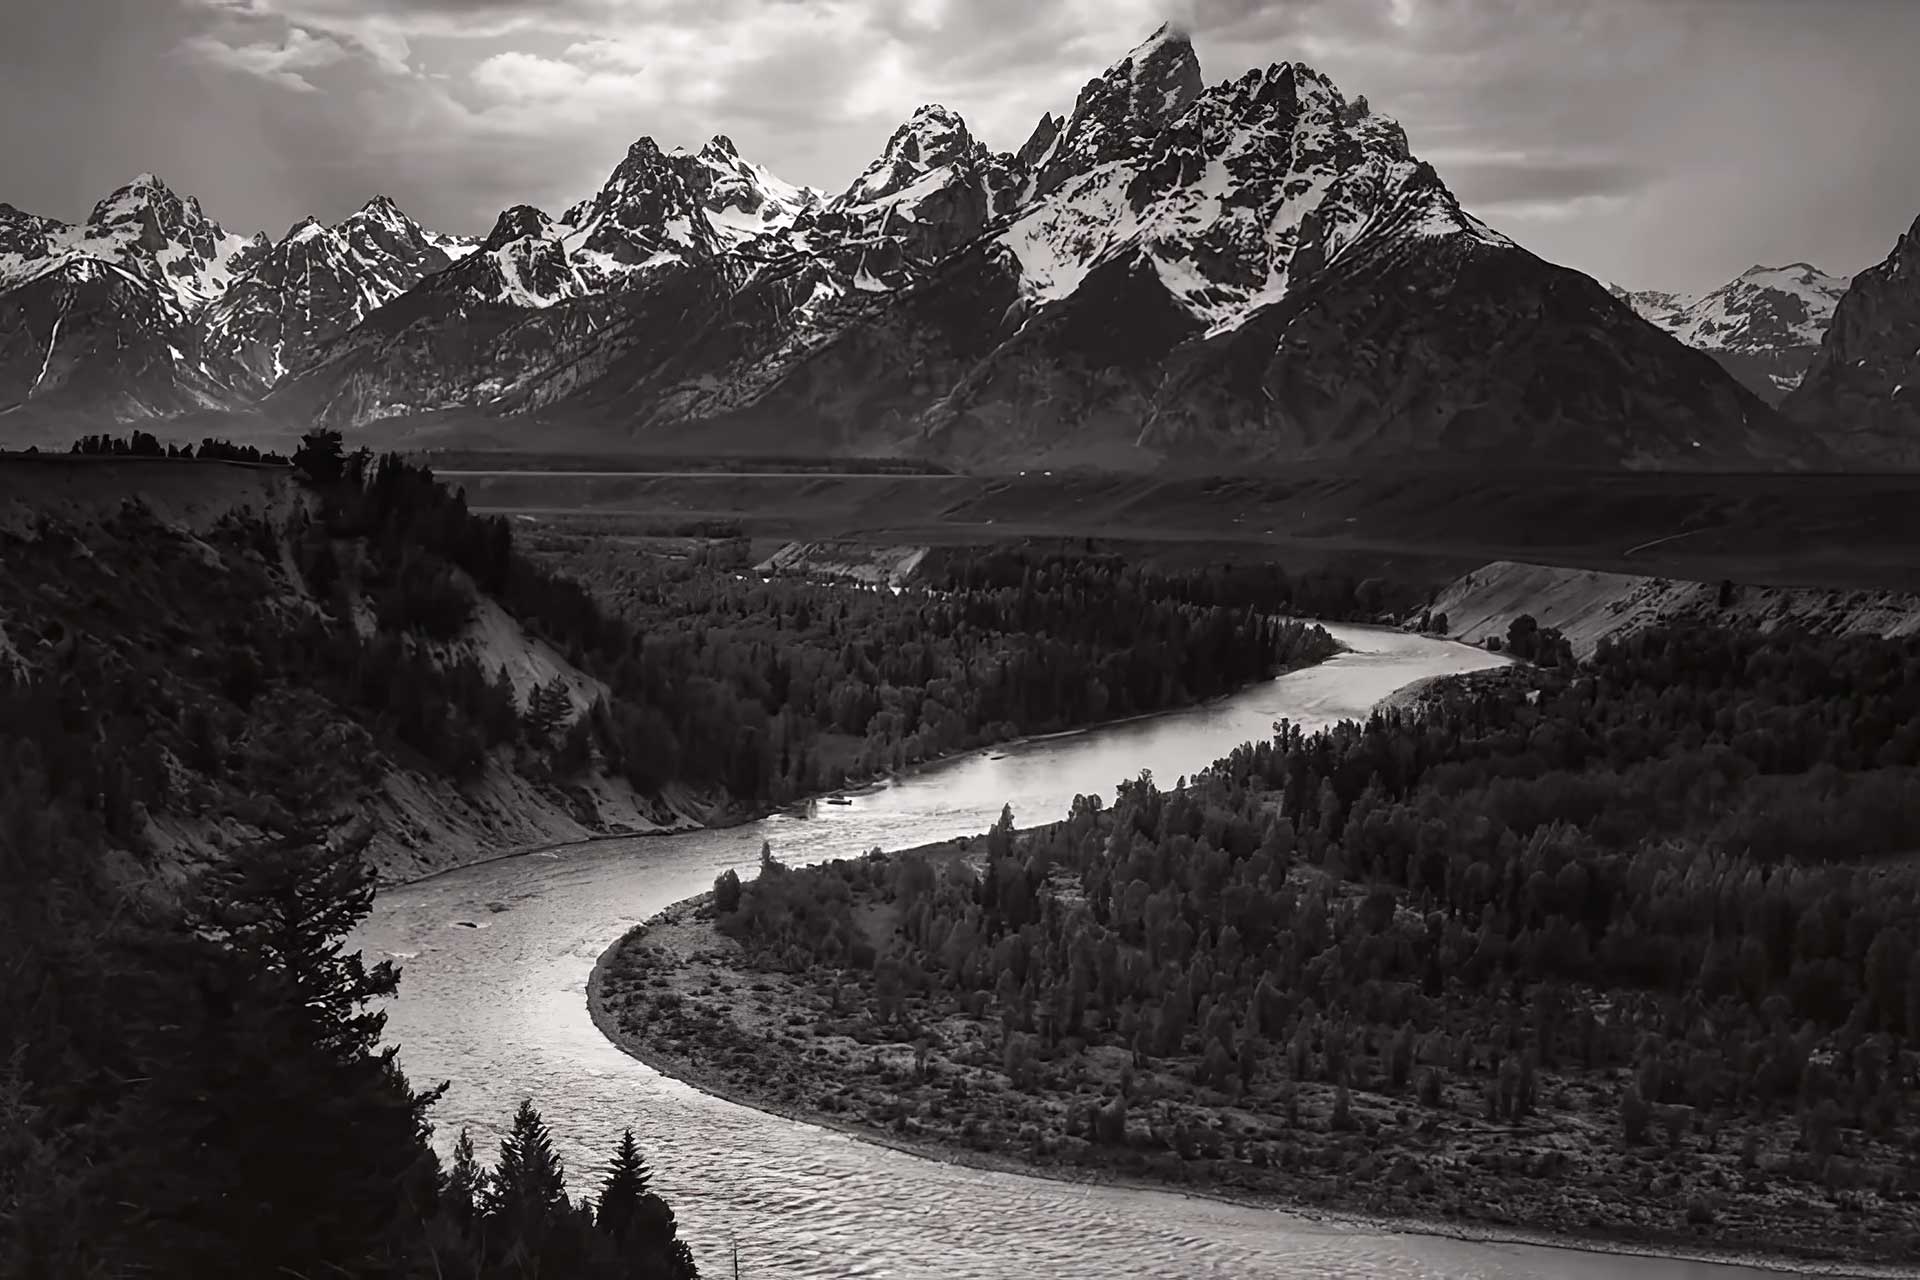
Another example is the American landscape photographer Ansel Adams, whose classic black-and-white photos of the American West still serve as genre benchmarks. Adams’ deep awareness of composition, along with his technical command of light, frequently produced compositions that followed the Golden Ratio. His landscapes, with their towering mountains, vast skies, and tranquil lakes, create a perfect balance that represents nature’s underlying mathematical order.
Understanding the Golden Ratio is one thing; putting it into practice is where the great power lies. Photographers wishing to incorporate this principle into their work have various options. Begin by visualising a Phi Grid or Fibonacci Spiral over your frame. Most current cameras and editing software include grid overlays that can assist in this process. When creating a shot, consider how to match your subject with the crossings or curves of these guides. This does not require mathematical precision; even approximating the Golden Ratio can result in more aesthetically pleasing visuals.
Landscape photographers can employ the Golden Ratio to add depth and movement to their photos. The composition becomes more dynamic by aligning the horizon with one of the Phi Grid lines or positioning a noteworthy element, such as a mountain peak or tree, at a key junction. Portrait photographers might use the Fibonacci Spiral to emphasise the subject’s face or eyes, directing the viewer’s attention to the image’s most essential features.
From the magnificent frescoes of the Renaissance to today’s digital screens, the Golden Ratio has served as an eternal pattern for beauty. Its use in photography serves as a reminder that visual art is more than just capturing moments; it is about organising materials in a way that communicates to something deeper within us. Whether through planned subject placement or the subtle flow of a composition, the Golden Ratio enables photographers to produce images that resonate with viewers on an almost subconscious level.
Understanding and adopting this ancient philosophy allows photographers to elevate their work, achieving a sense of balance, harmony, and beauty that goes beyond the ordinary. Just as Renaissance artists attempted to represent the divine in their work, modern photographers can use the Golden Ratio to create compositions that are eternal and universally appealing.
Rembrandt's Legacy: Creating Emotion with Light and Shadow
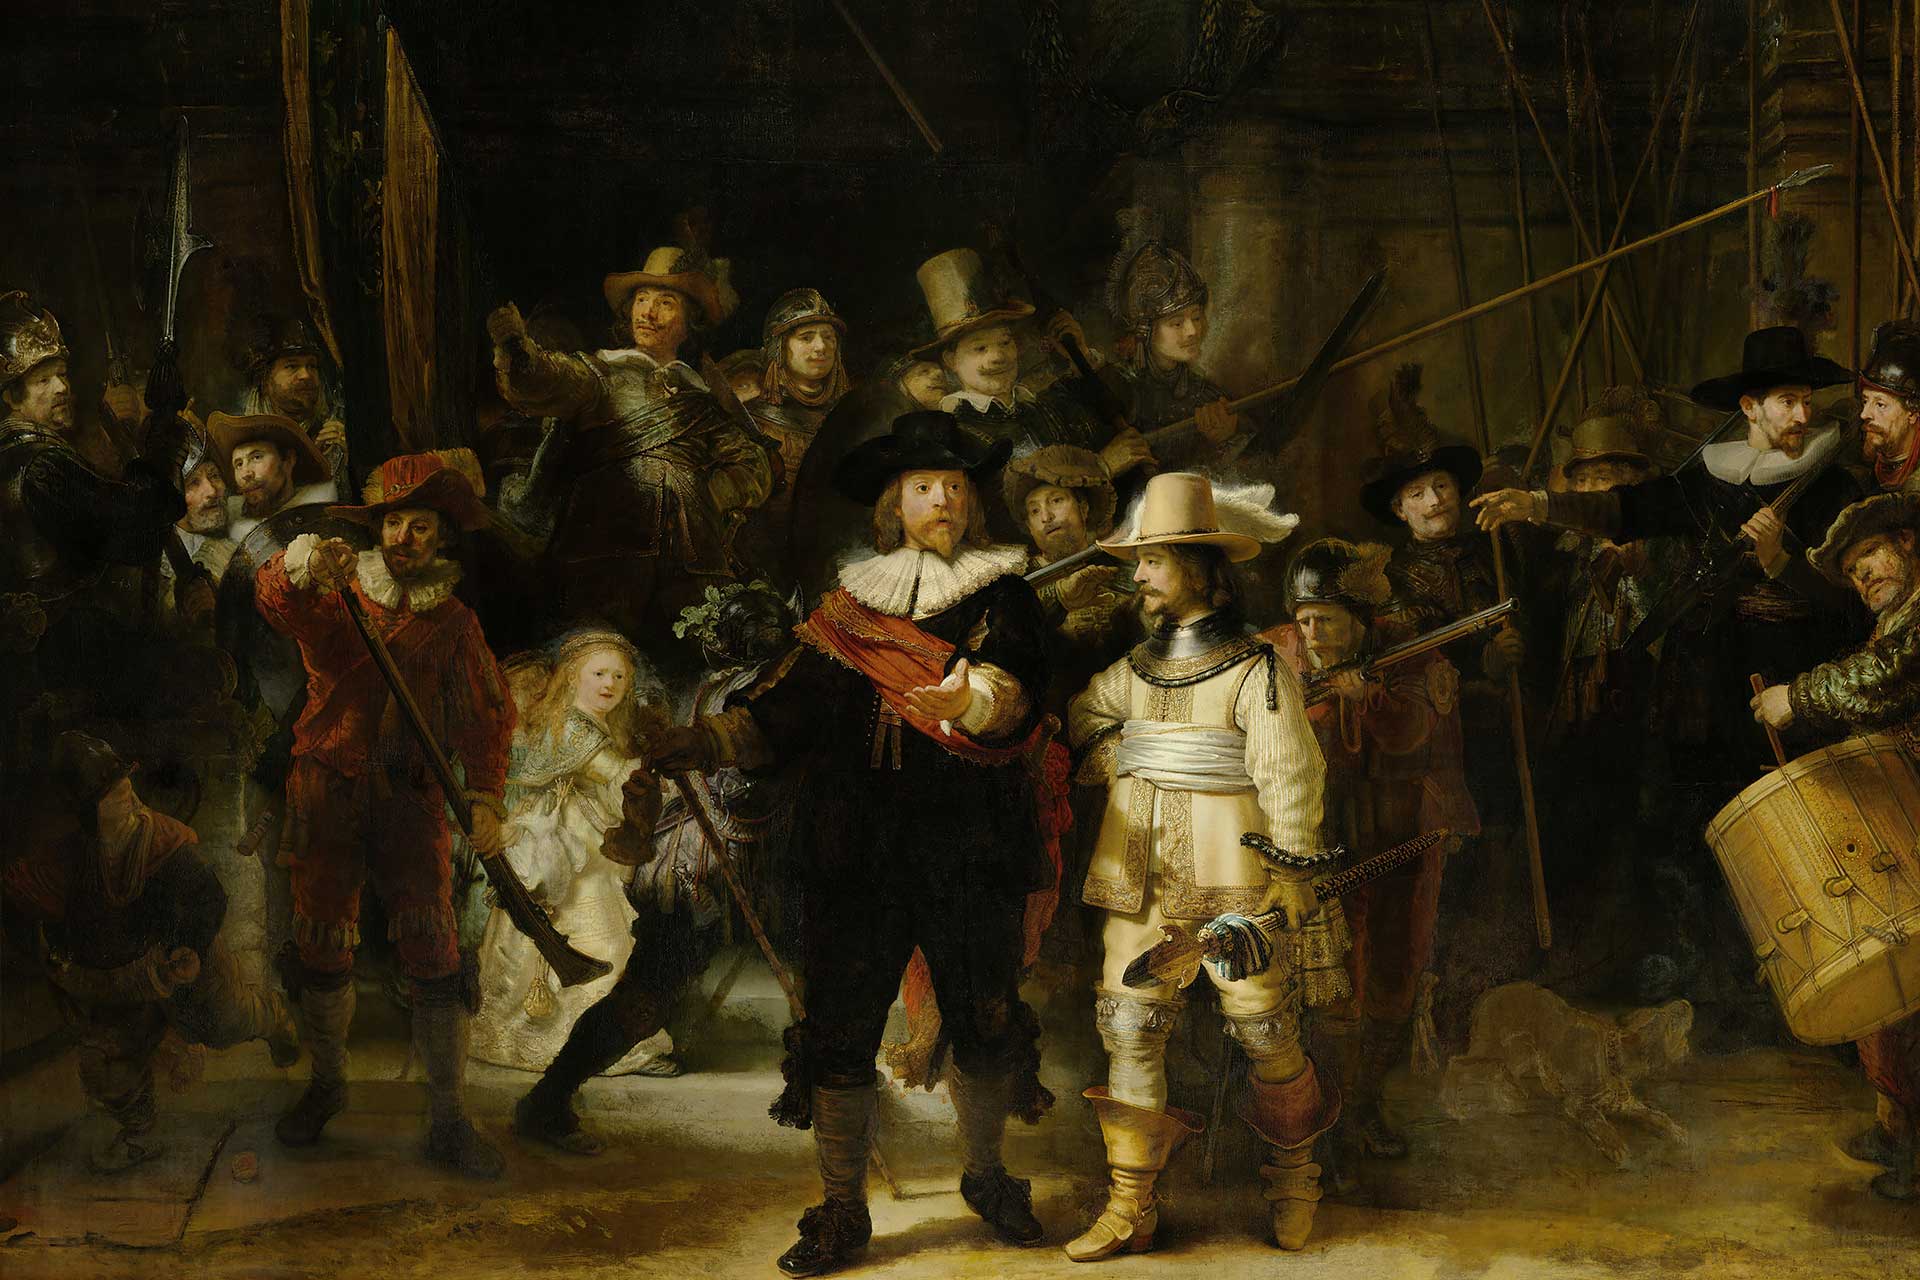
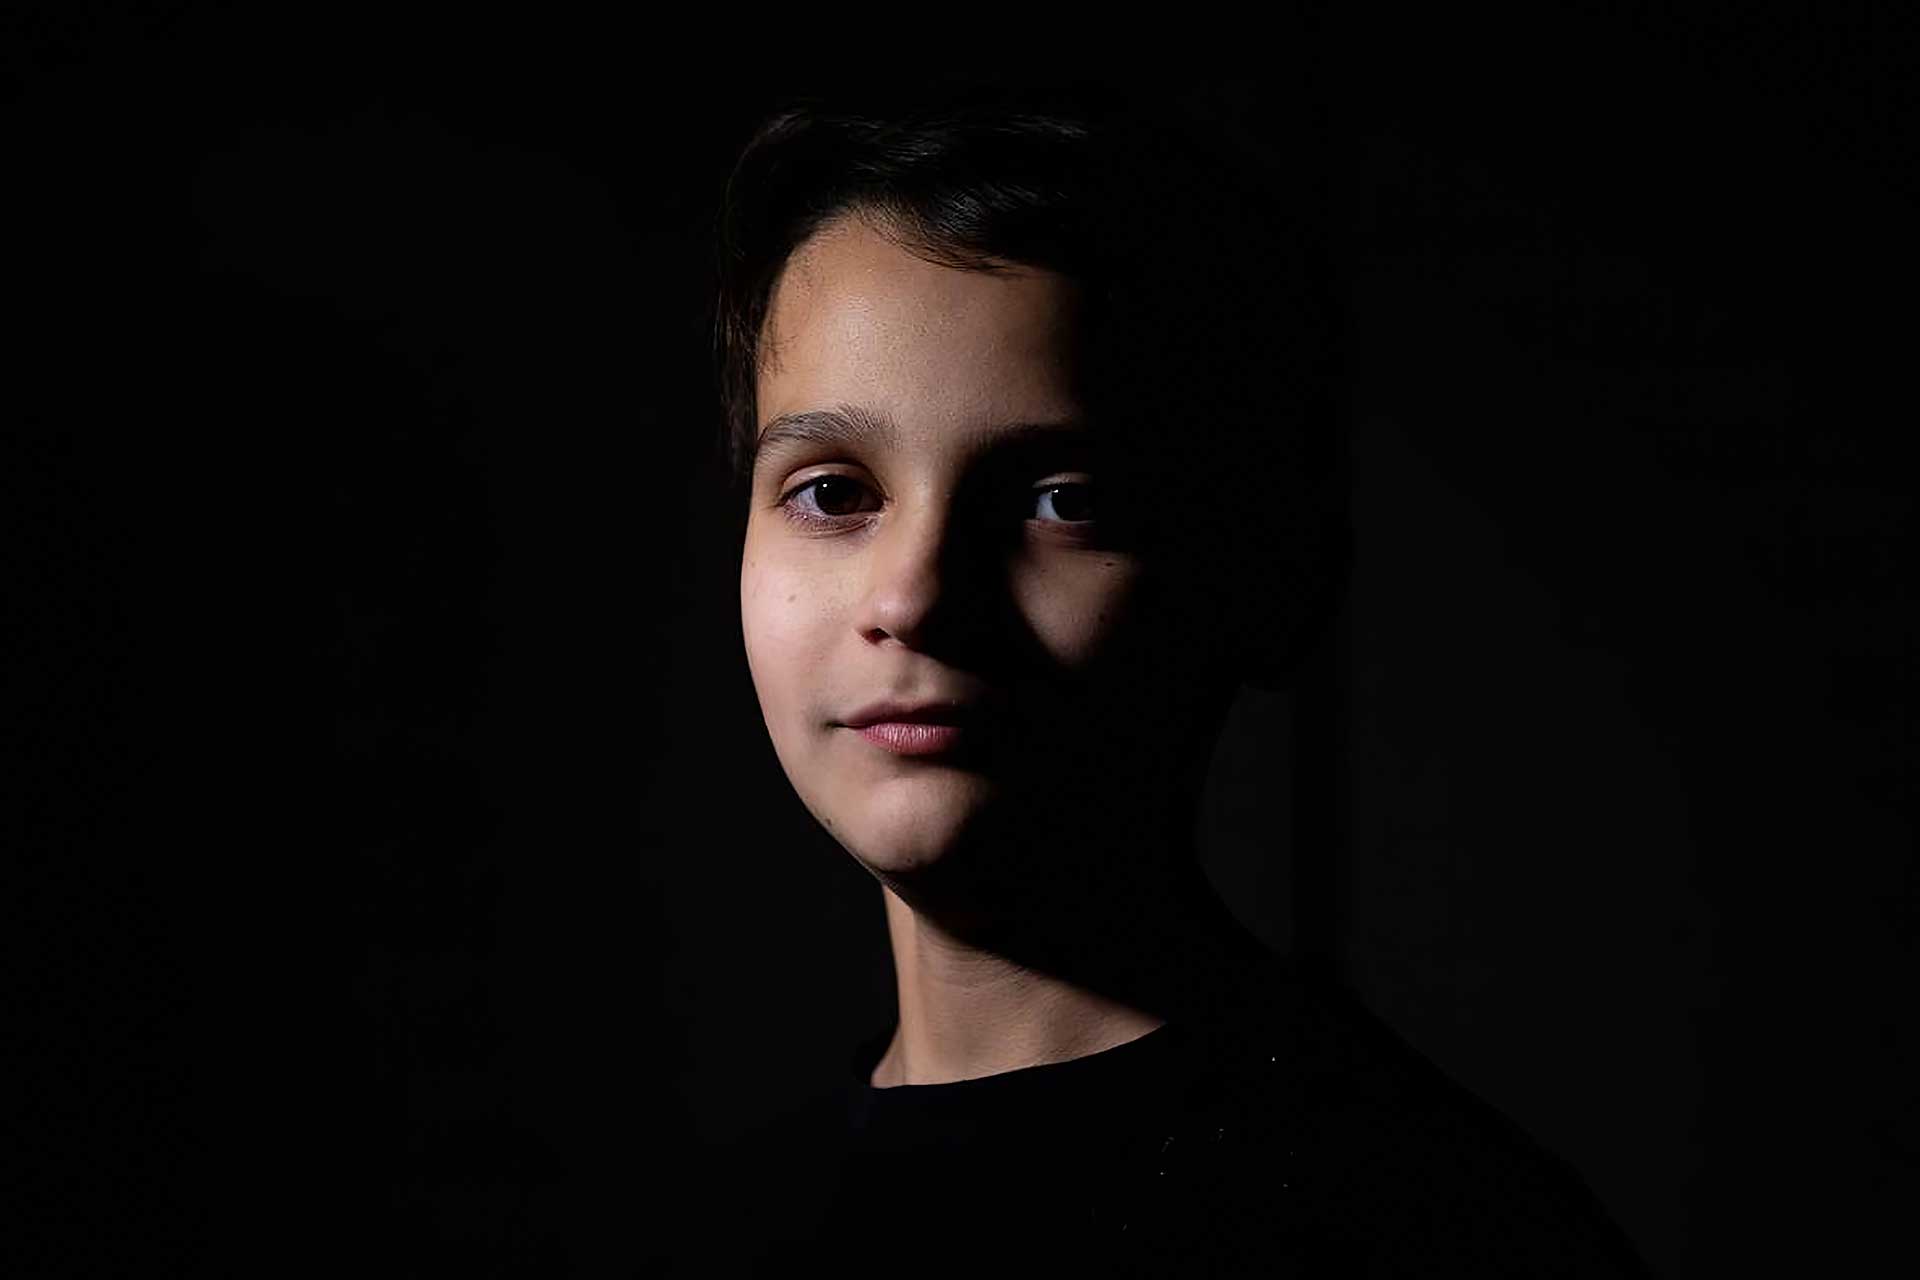
When discussing the history of art, few names ring as true as Rembrandt van Rijn. Rembrandt lighting, named after him, is a famous method for photographing portraits that he popularised by manipulating light and shadow. His work has inspired many artists and photographers. Photographers who strive to capture the essence of their subjects have turned to this method, which was influenced by the painter’s extraordinary talent for creating dramatic and moving portraits.
Rembrandt illumination has its roots in the 17th-century Dutch Golden Age, a time of tremendous artistic, scientific, and cultural accomplishment. The amazing skill of Rembrandt allowed him to employ chiaroscuro, the dance of light and shadow, to imbue his paintings with an unmatched emotional intensity. On the shaded side of the subject’s face, his photographs frequently featured a triangle of light under their eye. The lighting style of Rembrandt became characterised by this tiny, glowing triangle that he created by meticulously manipulating light.
One must be well-versed in the basics of light and subject location in order to replicate this classic photographic method. Typical Rembrandt lighting is positioning a single light source 45 degrees off-center from the subject, just above eye level. By arranging the subject such that the light hits one side of the face and casts a shadow on the other, we can make out the eye and cheekbone on the side that is in shadow thanks to the little triangle of light.
Careful attention to detail is required to execute Rembrandt’s lighting. Getting the light source right is the first order of business. While it is possible to work with natural light, the consistency and control offered by studio strobes or softboxes make artificial lighting the way to go. It is important to position the main light at the right angle and height so that it casts the shadow you want. Equally important is adjusting the light’s intensity; too dim light will not produce the desired dramatic impact, while too bright would produce unpleasant contrasts.
Properly positioning the subject follows the establishment of adequate lighting. The ideal lighting setup has the subject’s back to the light and their body slightly inclined away from it. By making this small change, we can bring out the best in the face and make that famous triangle of light. When trying to portray a certain feeling or atmosphere, nothing is more crucial than the subject’s facial expression and posture. Portraits that strive to capture the subject’s inner essence are perfect for Rembrandt lighting since it so effectively evokes a sense of concentration and meditation.

It takes time and trial and error to become an expert Rembrandt lighting. To get the most out of it, consider these suggestions:
- User Reflector : Consider positioning a reflector across from the key light to even out the shadows and bring some light to the face’s darkest areas. This can make the lighting look more subtle by reducing the sharpness of the shadows.
- It’s important to pay attention to backgrounds because they can greatly affect the mood of the photograph. The subject’s face and emotions are brought to light by Rembrandt’s dramatic lighting, which is intensified by a dark, unadorned background.
- Try Out Different Angles: The standard 45-degree angle is a solid foundation, but don’t be hesitant to play around with other angles and heights. Every portrait can be made special with just a few tweaks that change the shadow patterns.
- The eyes, which are often said to be the windows to the soul, are the focal point of Rembrandt’s lighting. For a more lively and expressive portrait, make sure the catchlights, which are little reflections of the light source in the eyes, are apparent.
- Manage the Light Spill: You can direct and diffuse the light by using flags, grids, or barn doors. This stops light from leaking onto the subject or the backdrop, which helps keep the lighting pattern where you want it.
Light, shadow, and human emotion are fundamental to Rembrandt’s lighting style, which is more than a technique. Photographers may take their portraits to the next level by learning Rembrandt’s lighting techniques and applying them to their own work. The resulting photographs will be breathtaking to look at and emotionally rich.
In this age of limitless digital possibilities, the classic allure of Rembrandt’s lighting serves as a reminder of the power of understatement and lighting skill. For photographers aspiring to portray the deep beauty of the human soul, it serves as a source of inspiration and a tribute to Rembrandt van Rijn’s talent.

Mastering the Light: Navigating Exposure Modes for Stunning Shots
Light, shadow, and timing are all aspects of photography that require finesse. By far, the most important thing a photographer can do is choose the appropriate exposure mode. Making this decision can prevent overexposure or shadows from destroying a scene’s soul or catching it in all its splendour. Light is a language that can be understood by studying exposure modes. The way your camera processes and records the light from your surroundings is determined by these modes. Manual, Aperture Priority, Shutter Priority, and Program are the four main exposure modes most cameras have.
To become a master photographer, you must learn to use manual mode. The shutter speed, aperture, and ISO can all be adjusted to the photographer’s liking. If you want to tweak every little thing in your shot, this is the setting for you. Envision yourself perched on a cliffline as the sun sets, painting the ocean a golden tint. To capture the vivid hues and minute details of this moment in time, switch to manual mode and fine-tune your camera settings. Manual mode, on the other hand, calls for an in-depth knowledge of exposure and could be intimidating to newcomers.

Photographers who specialise in landscapes and portraits often use the Aperture Priority mode. By adjusting the aperture, you may control the depth of field in this mode, while the shutter speed is automatically adjusted by the camera. For portraits, you might concentrate on getting the background softly blurred, and for landscapes, you can make sure the foreground and background are sharp. For example, when you obscure the far horizon in order to highlight the solitary tree in a large meadow, you are engaging in an artistic endeavour.
Conversely, photographers who capture action or sports typically use Shutter Priority mode. Here, you can control the aperture and shutter speed independently to capture moving subjects in slow motion or blur their movements. A photograph depicting a dancer in the midst of a graceful leap. With a quick shutter speed, her every movement will be frozen, revealing every nuance of her graceful strength. On the flip side, if you want to emphasise her graceful movements and give the shot more energy, try using a slower shutter speed.

Many people find that program mode strikes a good balance between completely automatic settings and still allowing them some control over the device. Even while you may still change things like white balance and ISO in this mode, the camera will choose the aperture and shutter speed for you. When time is of the essence but you still want full creative control, this mode is ideal. Imagine yourself navigating a frenetic market, where the brilliant colours and energetic vibes shift with each step. Be sure you don’t miss a captivating moment by quickly adapting in program mode.

Choosing the correct exposure mode requires more than simply technical know-how; it also requires mental rehearsal of the tale you hope to convey. There are a variety of photographic needs and styles, and each mode provides a unique degree of control and creative freedom. Get to know and love these modes, and your camera’s capabilities will be unlocked, allowing you to realise your creative vision.
Ultimately, the optimal exposure setting is the one that complements your creative goals and the environment in which you’re working. Choosing the correct exposure mode is an important step in taking captivating and unforgettable images, whether you are capturing the tranquil beauty of a mountain scene, the lively energy of a city street, or the personal expression of a loved one.

The Timeless Debate: Color vs Monochrome
The choice between black and white (BW) and colour photography has a considerable impact on an image’s mood, message, and overall effectiveness. Each method provides distinct chances for storytelling and artistic expression, and grasping the nuances of each can help you improve your photography skills. In this article, we will look at the elements to consider when picking between black and white and colour photography, as well as how to make an informed decision.
Black and white photography, often considered as a timeless classic, focuses on form, texture, and contrast. It eliminates colour distractions, enabling the viewer to focus on the image’s composition and tonal range. The lack of colour can be very useful in emphasising the emotional depth and atmosphere of a scene. For example, black-and-white photography can evoke nostalgia or drama, making it perfect for portraiture, architectural photography, and historical themes. The interplay of light and shadow becomes more pronounced, and nuances of detail can be highlighted without the use of colour.
When photographing portraits, black & white can give a stronger sense of intimacy and honesty. The absence of colour draws attention to the subject’s expressions and features, letting the viewer to connect more deeply with the emotions depicted. Similarly, architectural photography allows for more vivid depictions of building materials and geometric patterns. The interaction of light on surfaces becomes more dramatic, emphasising the structure’s design and form.
Colour photography, on the other hand, provides a distinct set of benefits, enhancing an image’s vibrancy and realism. Colour can convey a specific ambiance or mood, adding context and increasing the visual impact of a scene. For example, the rich hues of a sunset or the colourful palette of a crowded market provide a degree of storytelling that black and white pictures may not. Colours can influence the viewer’s perception and emotional response, therefore colour photography is especially effective for capturing dynamic scenes and natural landscapes.
Colour is important in landscape photography because it conveys the genuine spirit of the place. The colour variations might represent different times of day, weather conditions, and seasons, adding to the overall narrative of the shot. Similarly, in wildlife photography, colour may bring out the natural beauty of animals and their environments, resulting in a more accurate and compelling portrayal.
When picking between black & white and colour, consider the subject matter and message you want to communicate. BW photography succeeds when the emphasis is on form, texture, and emotional depth. It is an effective method for achieving a timeless, classic appearance while highlighting the key parts of composition. Colour photography, on the other hand, is ideal for capturing the vibrancy and diversity of our surroundings, so increasing an image’s realism and contextual depth.
Another key element to consider is the general vibe you want to create. BW photography can create feelings of nostalgia, solemnity, or meditation, making it ideal for themes that require a more muted or abstract expression. Colour photography, which can depict brilliant details and dynamic settings, is good at portraying energy, excitement, and reality.
The decision between BW and colour depends on the technical factors of your photography. BW photos frequently necessitate careful consideration of contrast and tone range to ensure that the details are sharp and the composition is visually appealing. Colour photography, on the other hand, entails controlling colour balance, saturation, and harmony in order to produce a unified and aesthetically acceptable image.
Finally, the choice between BW and colour photography is a matter of personal taste and artistic vision. Both styles provide useful tools for expression and narrative, and mastering them can broaden your creative horizons. Experimenting with both black & white and colour in different situations will help you acquire a sharp eye for when to employ either method, allowing you to produce images that have a deep impact on your audience.
To summarise, whether you select black and white or colour photography, understanding the benefits and implications of each method can improve your ability to communicate through photos. You may generate more impactful images by taking into account the subject matter, mood, and technical needs. Both black and white and colour photography provide distinct potential for artistic expression, and studying these options will expand your photographic experience.

The Art of Photo Story Crafting Narratives That Resonate Deeply
In today’s visually saturated world, single images often fail to capture the depth and complexity of a moment or subject. While a well-composed photo can indeed be striking, it frequently lacks the narrative power needed to engage viewers fully. This is where photo stories come into play. By weaving a sequence of images into a cohesive narrative, photographers can transform their work from mere snapshots to rich, immersive experiences that resonate with their audience on a deeper level.
Photo stories offer a dynamic alternative to single images by providing context, depth, and continuity. They allow photographers to explore their subjects more comprehensively, capturing not just a moment in time, but the nuances and complexities of a situation or theme. A well-crafted photo story can convey emotions, chronicle events, and highlight contrasts in a way that a single image simply cannot.
Producing a compelling photo story requires careful planning, a clear narrative structure, and a deep understanding of the subject. Here are some essential steps to guide photographers in creating photo stories that captivate and inform.
Concept and Theme Development
Start by defining a clear concept or theme for your photo story. This could be anything from documenting a local festival, capturing the daily life in a remote village, to exploring environmental changes in a specific area. The theme should be specific enough to give direction but broad enough to allow for a variety of shots.
Research and Planning
Thorough research is crucial. Understand your subject, its history, and its context. This background knowledge will help you anticipate key moments and identify the most compelling aspects of your story. Plan your shots, considering locations, times of day, and any necessary permissions or logistical arrangements.
Story Line
A successful photo story has a beginning, middle, and end. Start by introducing your subject and setting the scene. Develop the story by highlighting key moments or changes, and conclude with a resolution or closing image that leaves a lasting impression. This narrative structure helps maintain the viewer’s interest and provides a satisfying journey through your images.
Diverse Perspectives
Capture a variety of shots to add depth and interest to your story. Use wide-angle shots to establish the scene, medium shots to show context, and close-ups to highlight details. Different perspectives can also convey different emotions and dynamics, enriching the overall narrative.
Consistency in Style
Maintain a consistent photographic style throughout your story. This includes aspects like color palette, lighting, and composition. Consistency helps create a cohesive and professional-looking photo story, enhancing its impact.
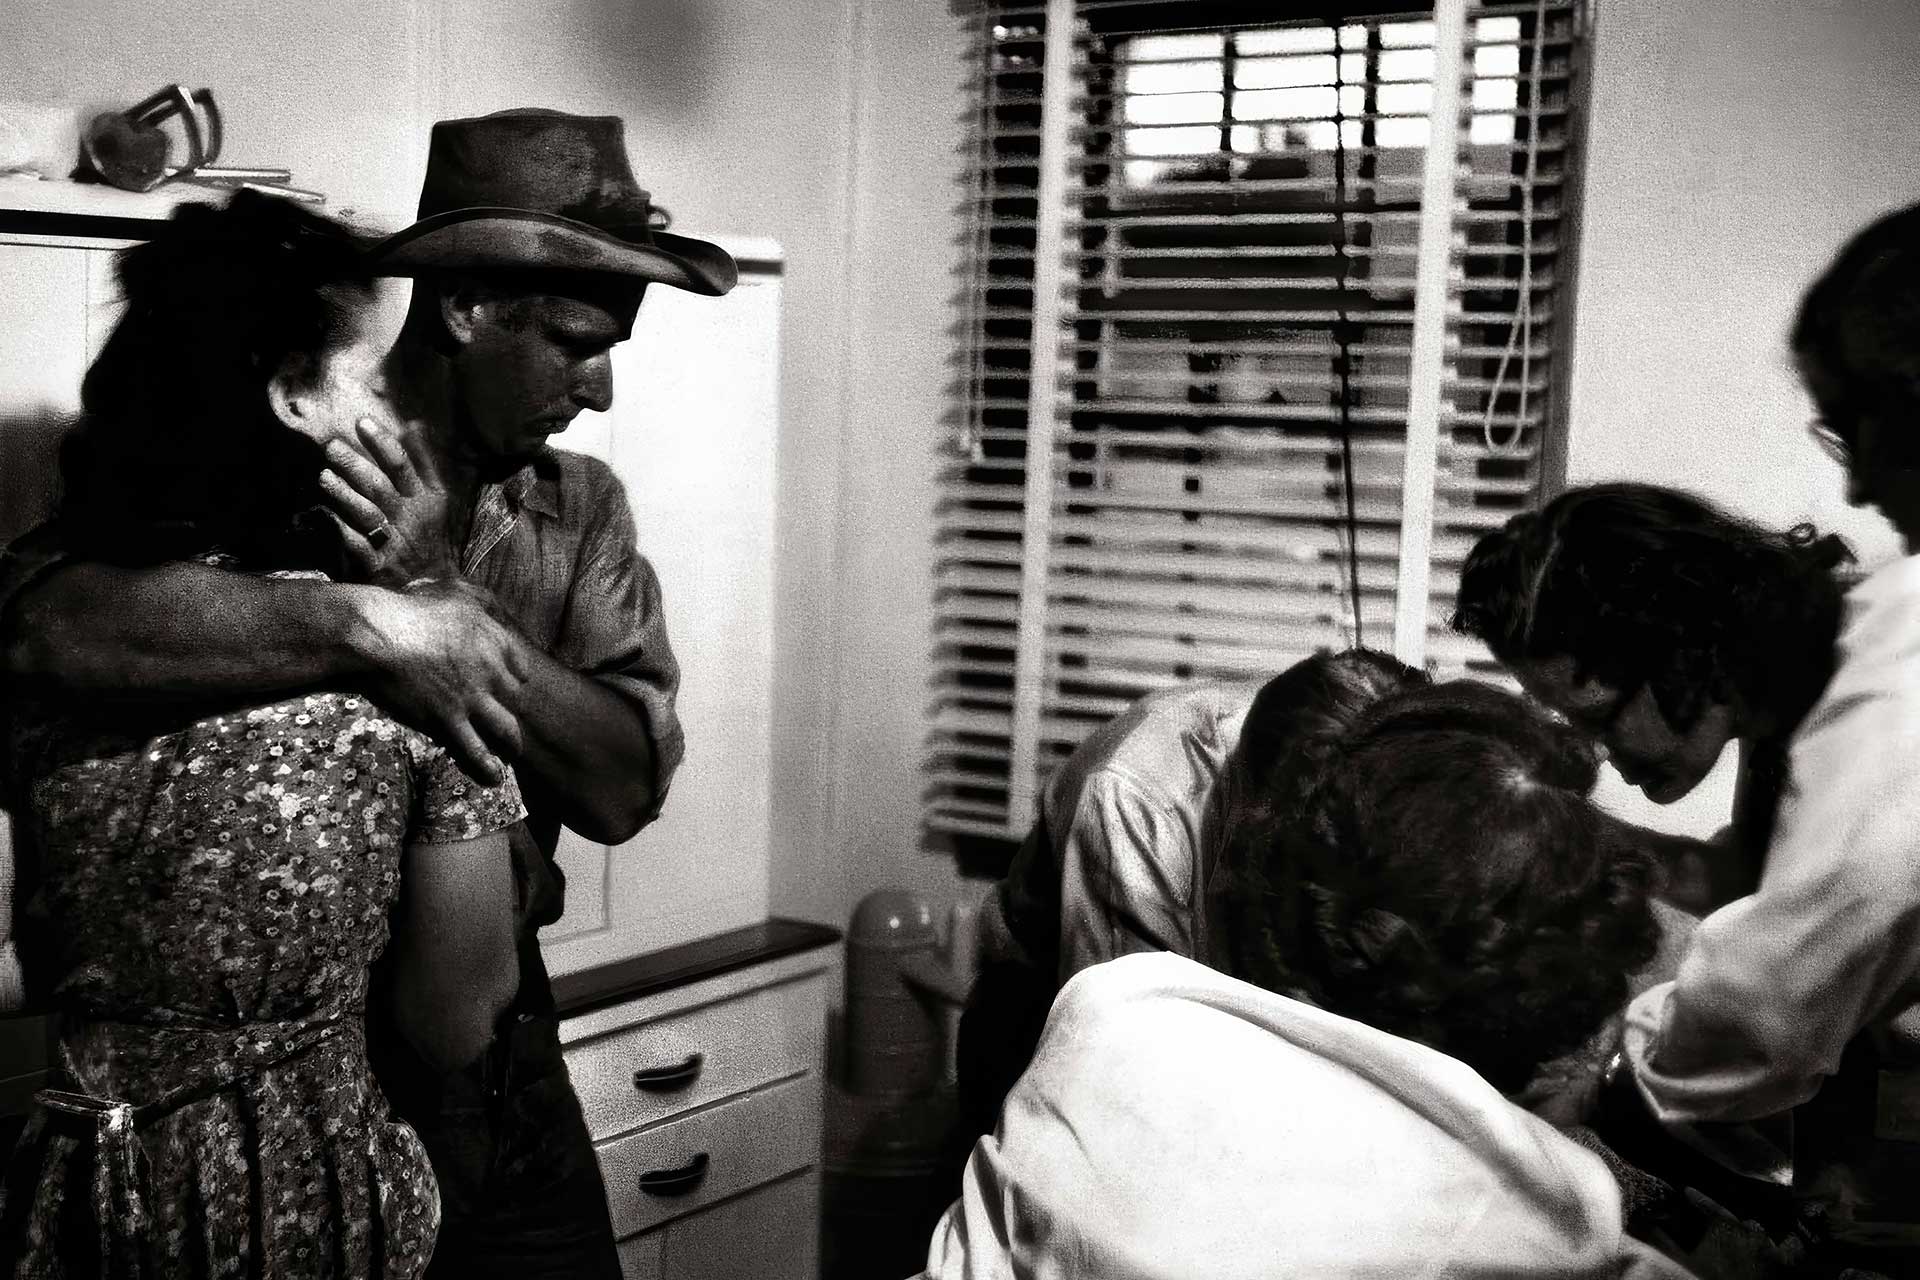
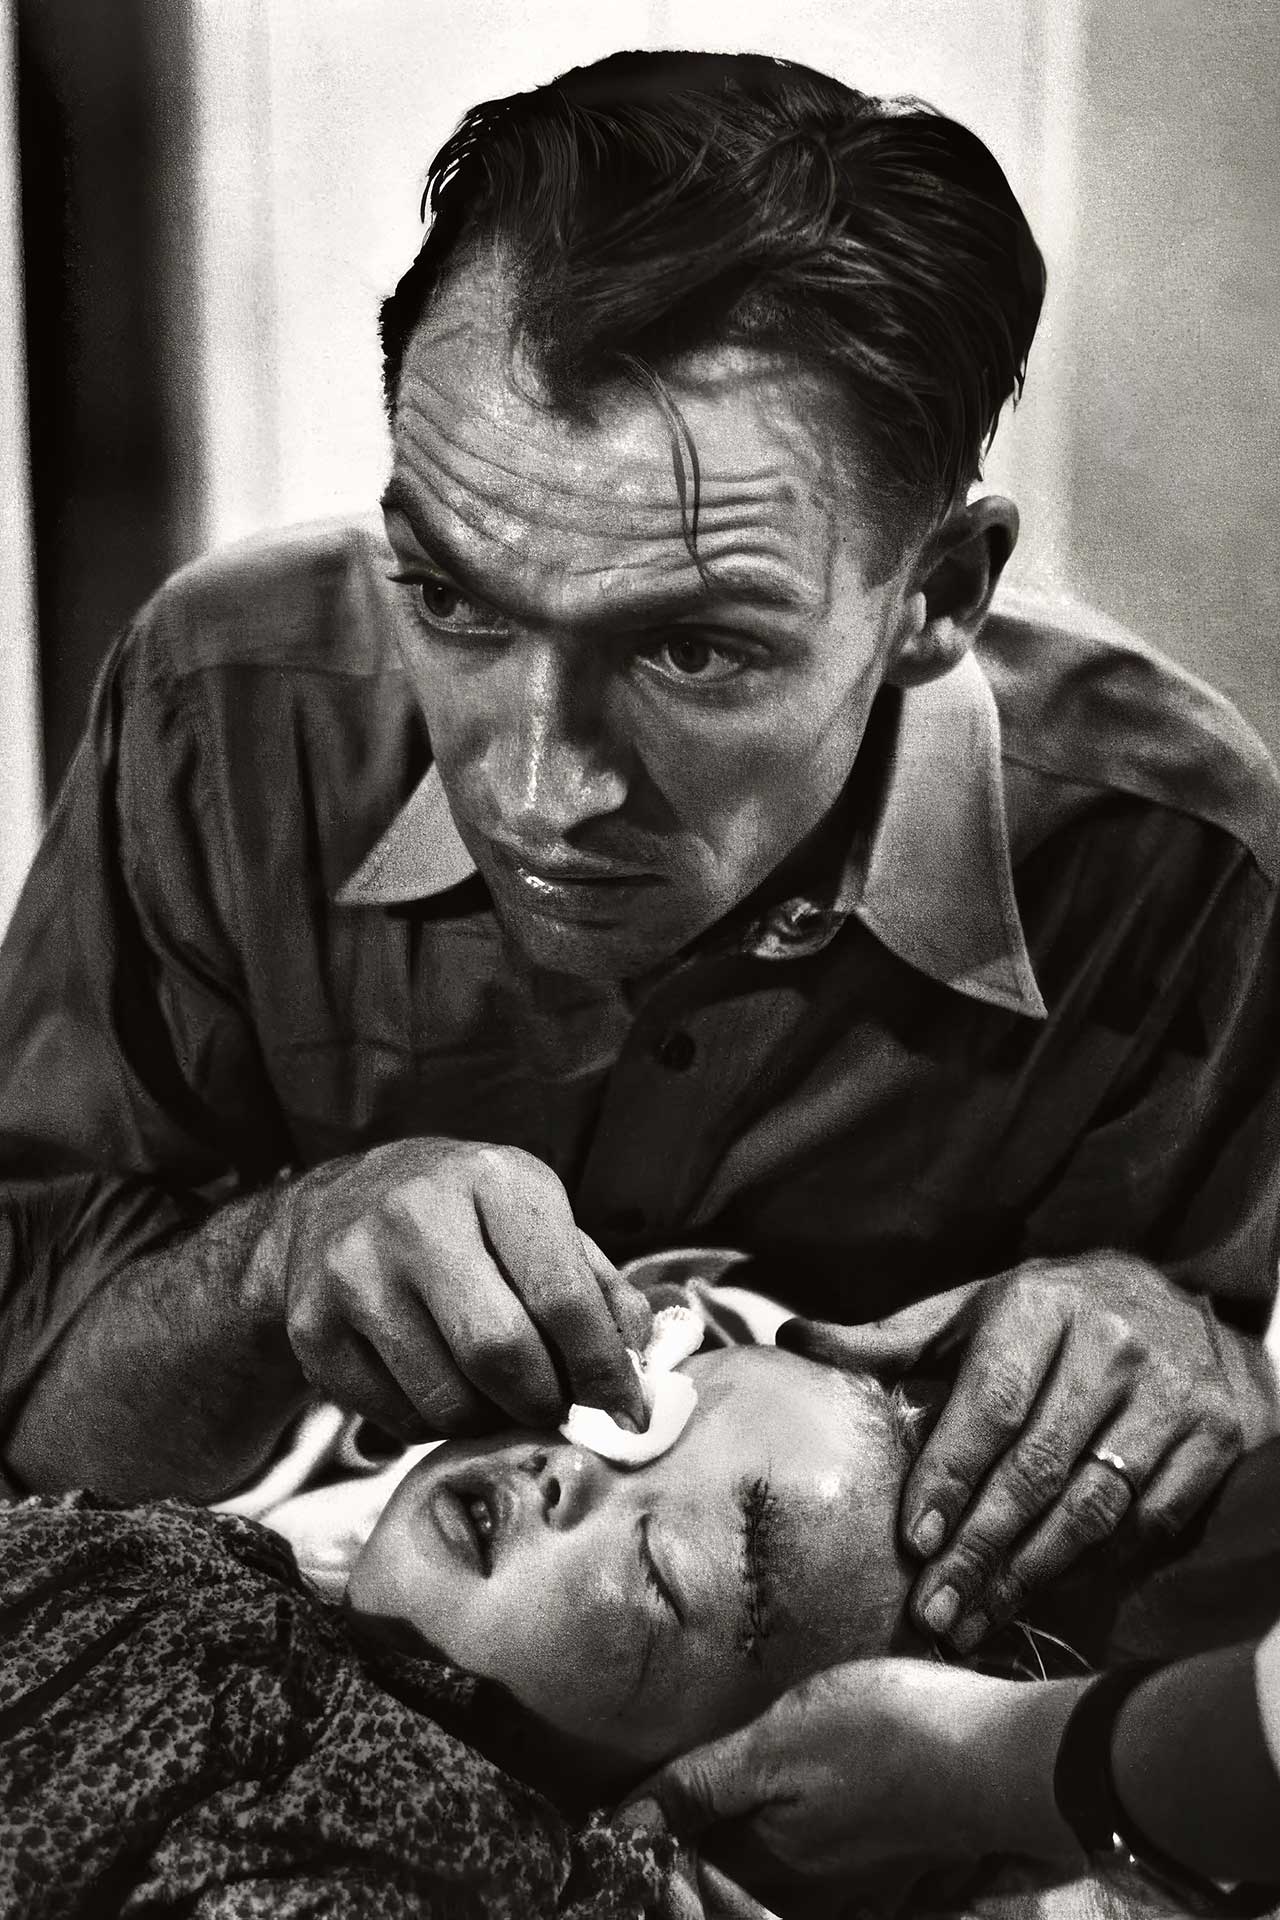
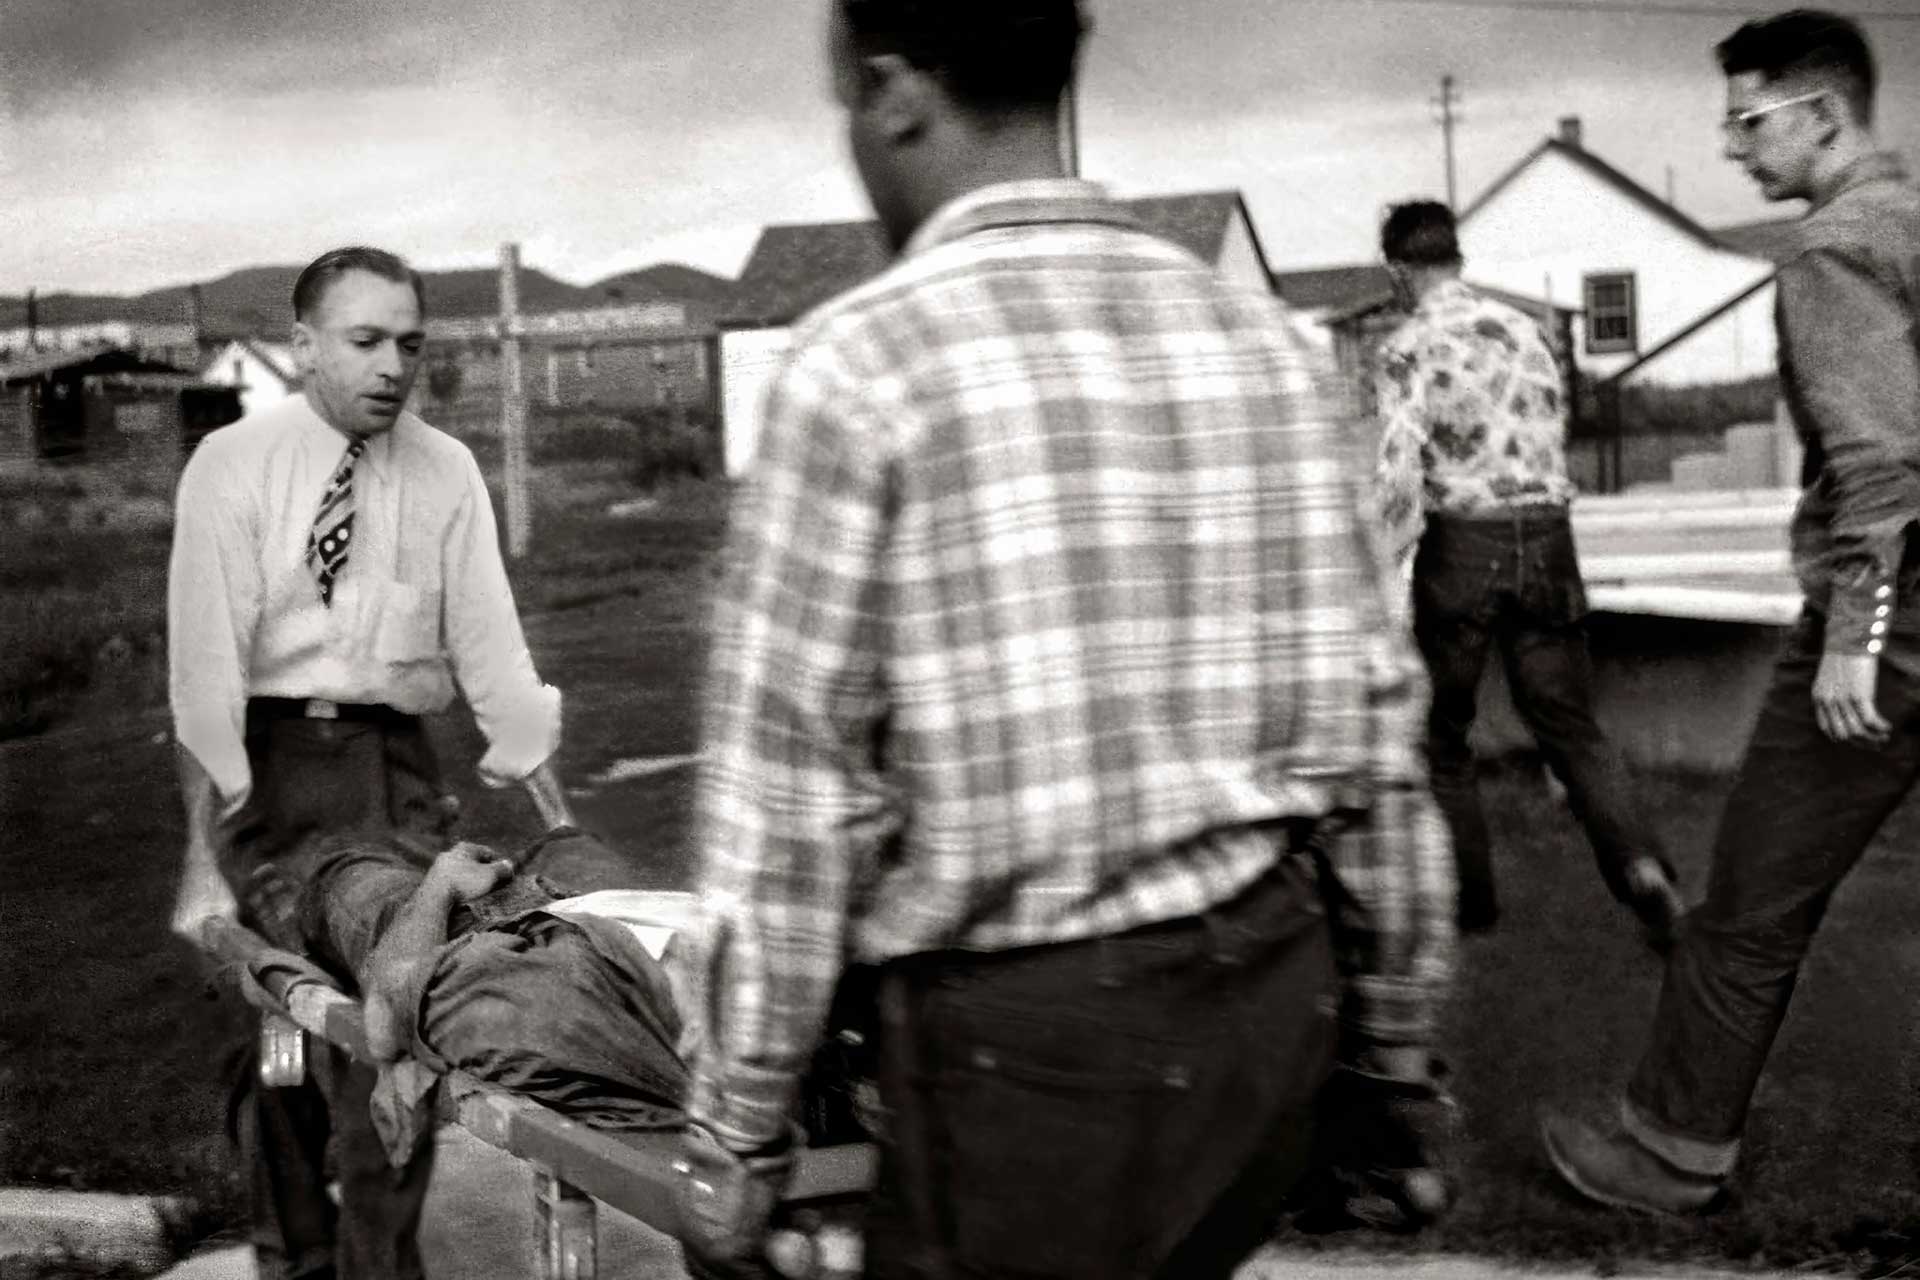
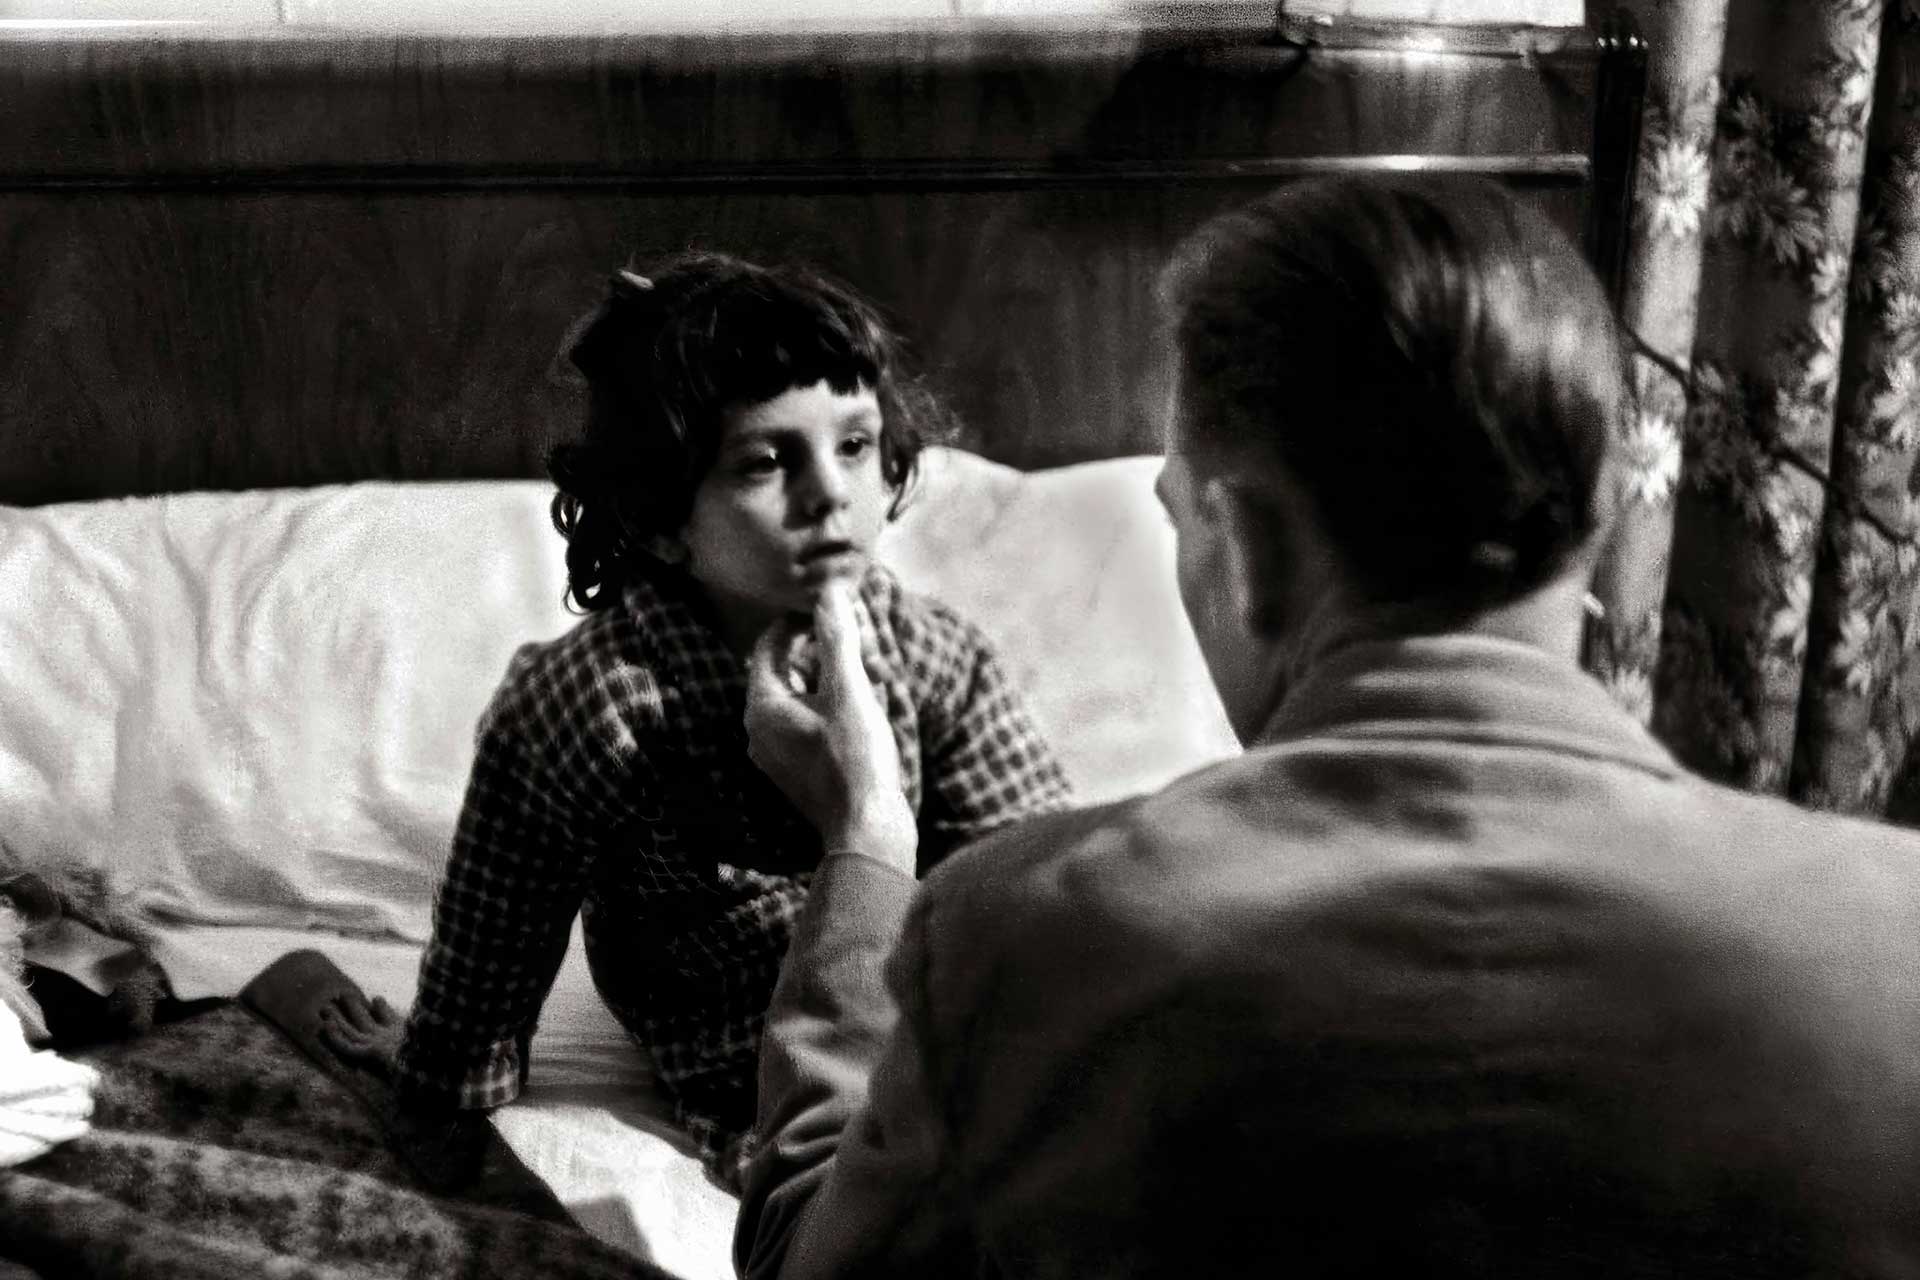
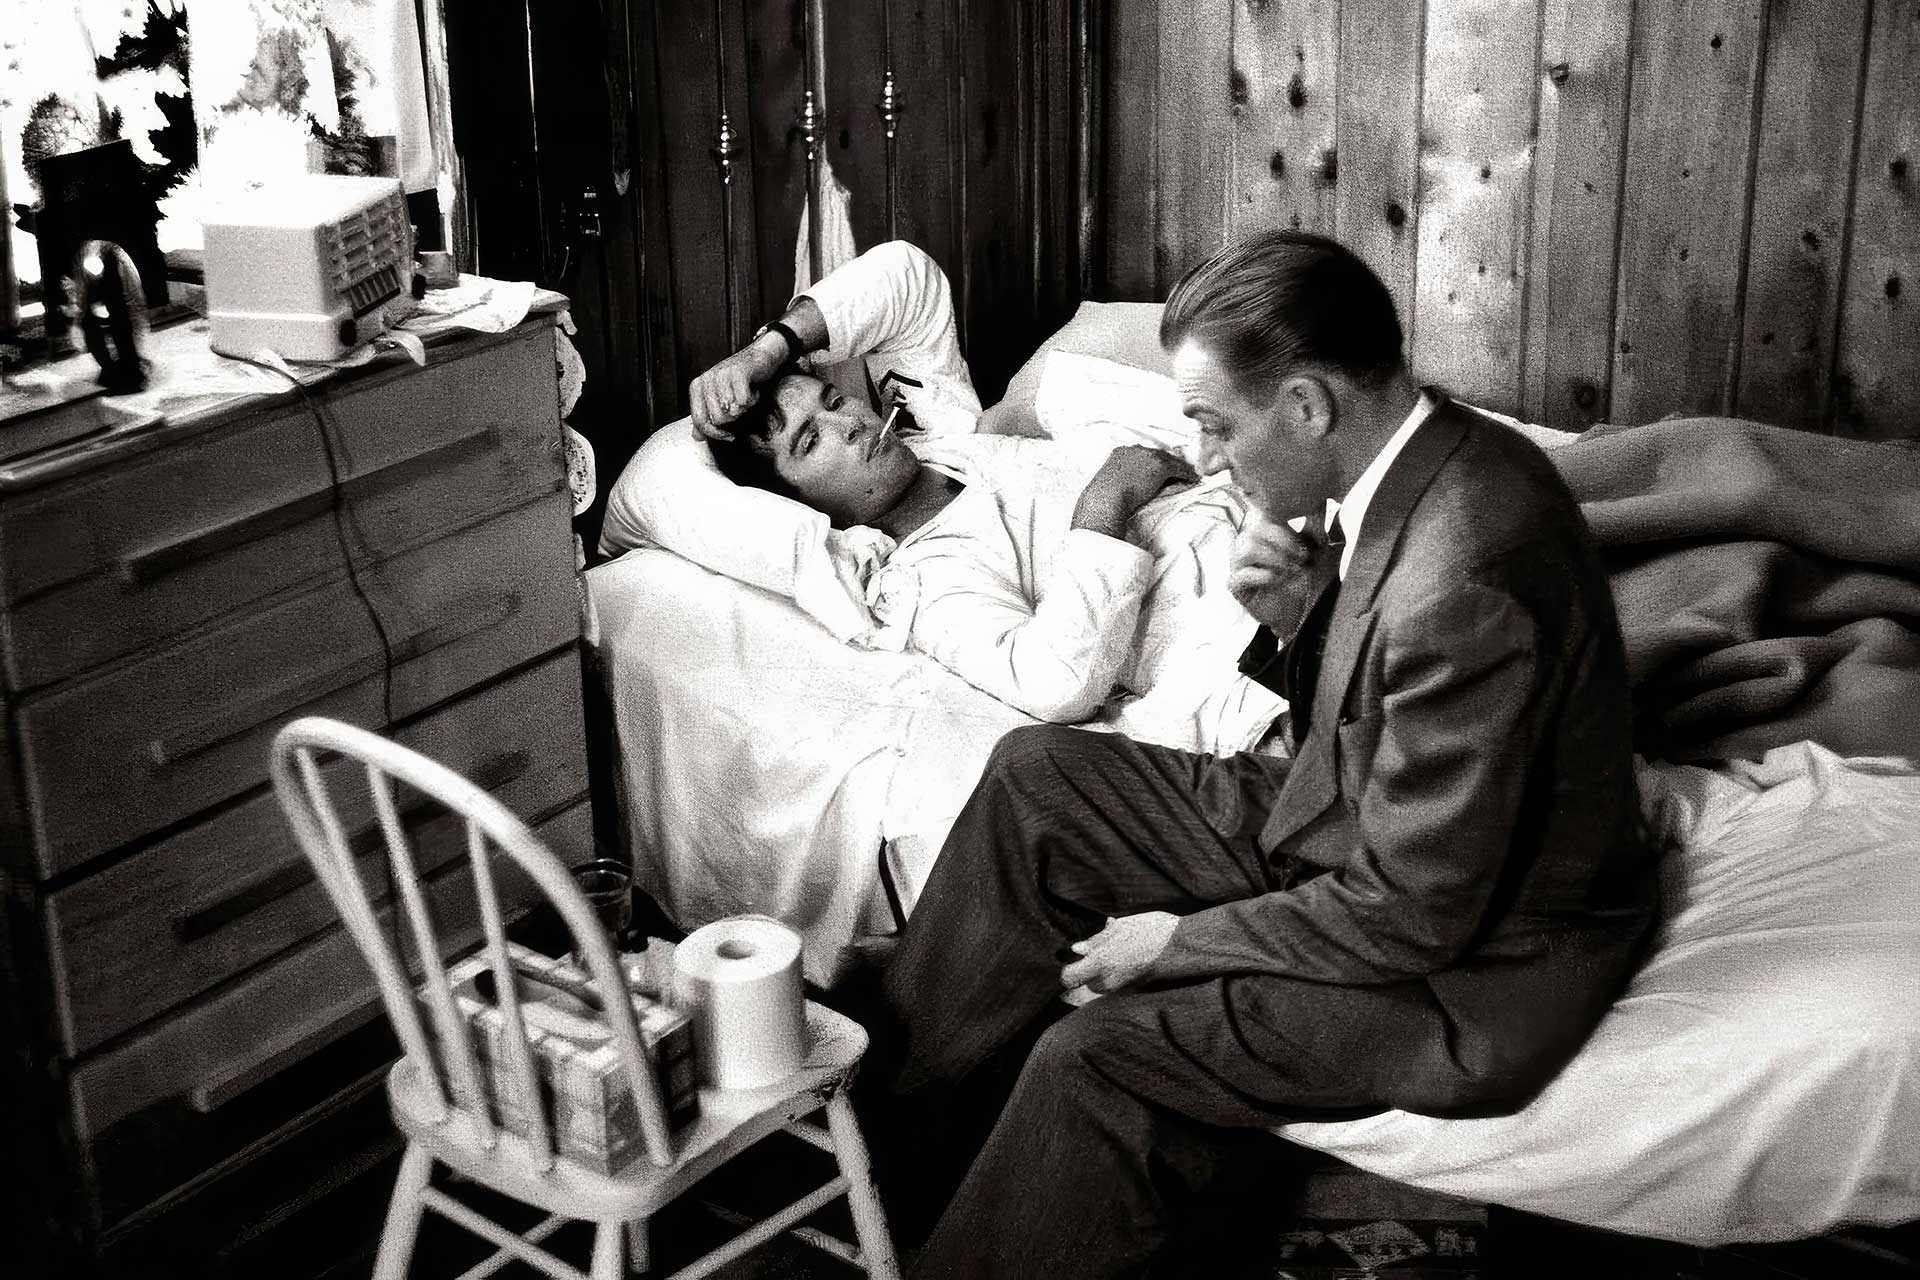
One of the most iconic photo stories is W. Eugene Smith’s “Country Doctor,” published in Life magazine in 1948. Smith spent 23 days with Dr. Ernest Ceriani, capturing the life of a rural physician in Kremmling, Colorado. This photo essay is celebrated for its intimate and empathetic portrayal of the doctor’s daily challenges and triumphs. Smith’s ability to capture a wide range of emotions, from exhaustion to compassion, and the detailed context of the doctor’s interactions with his patients, makes “Country Doctor” a powerful narrative.


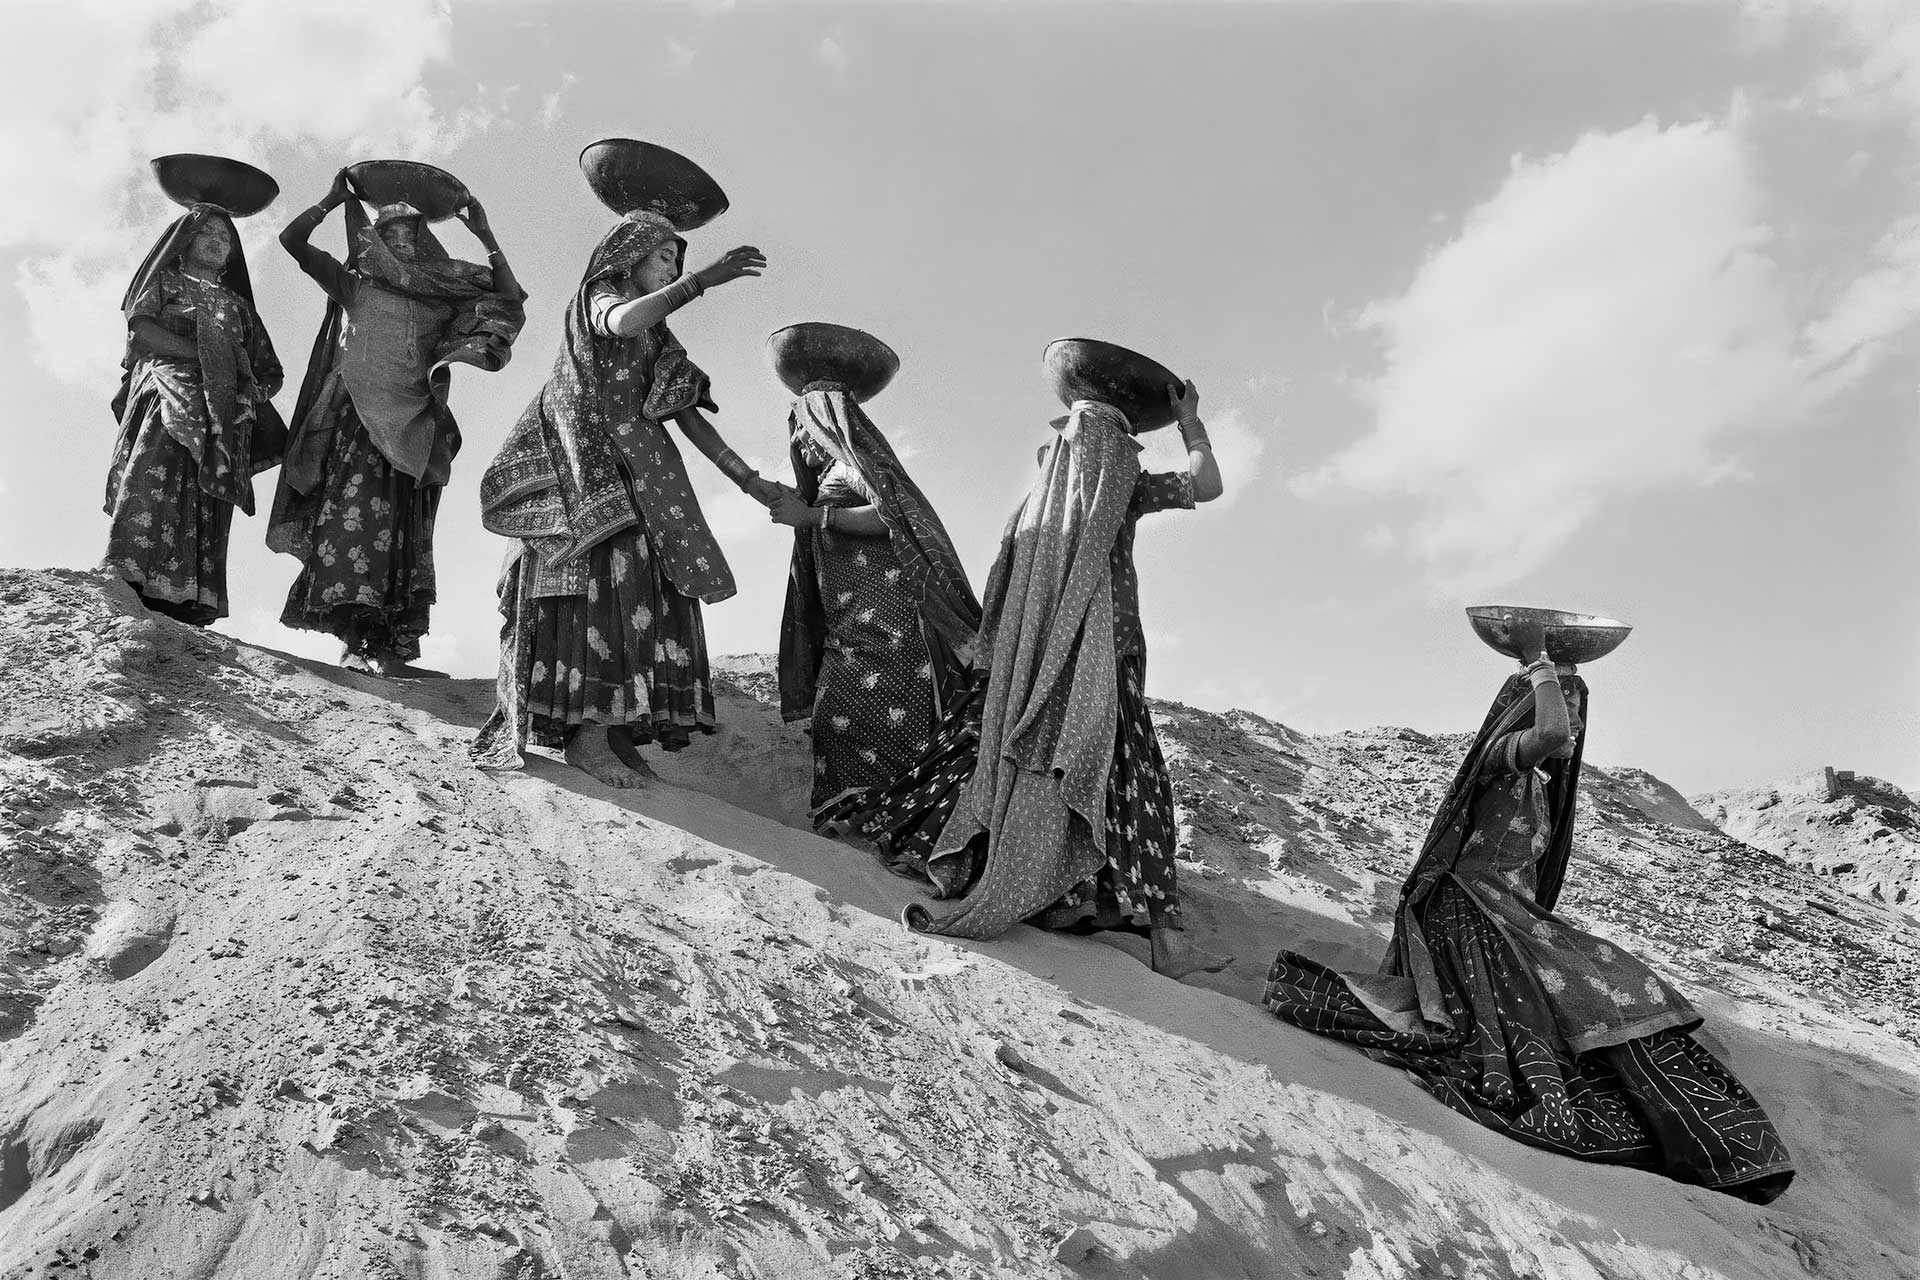
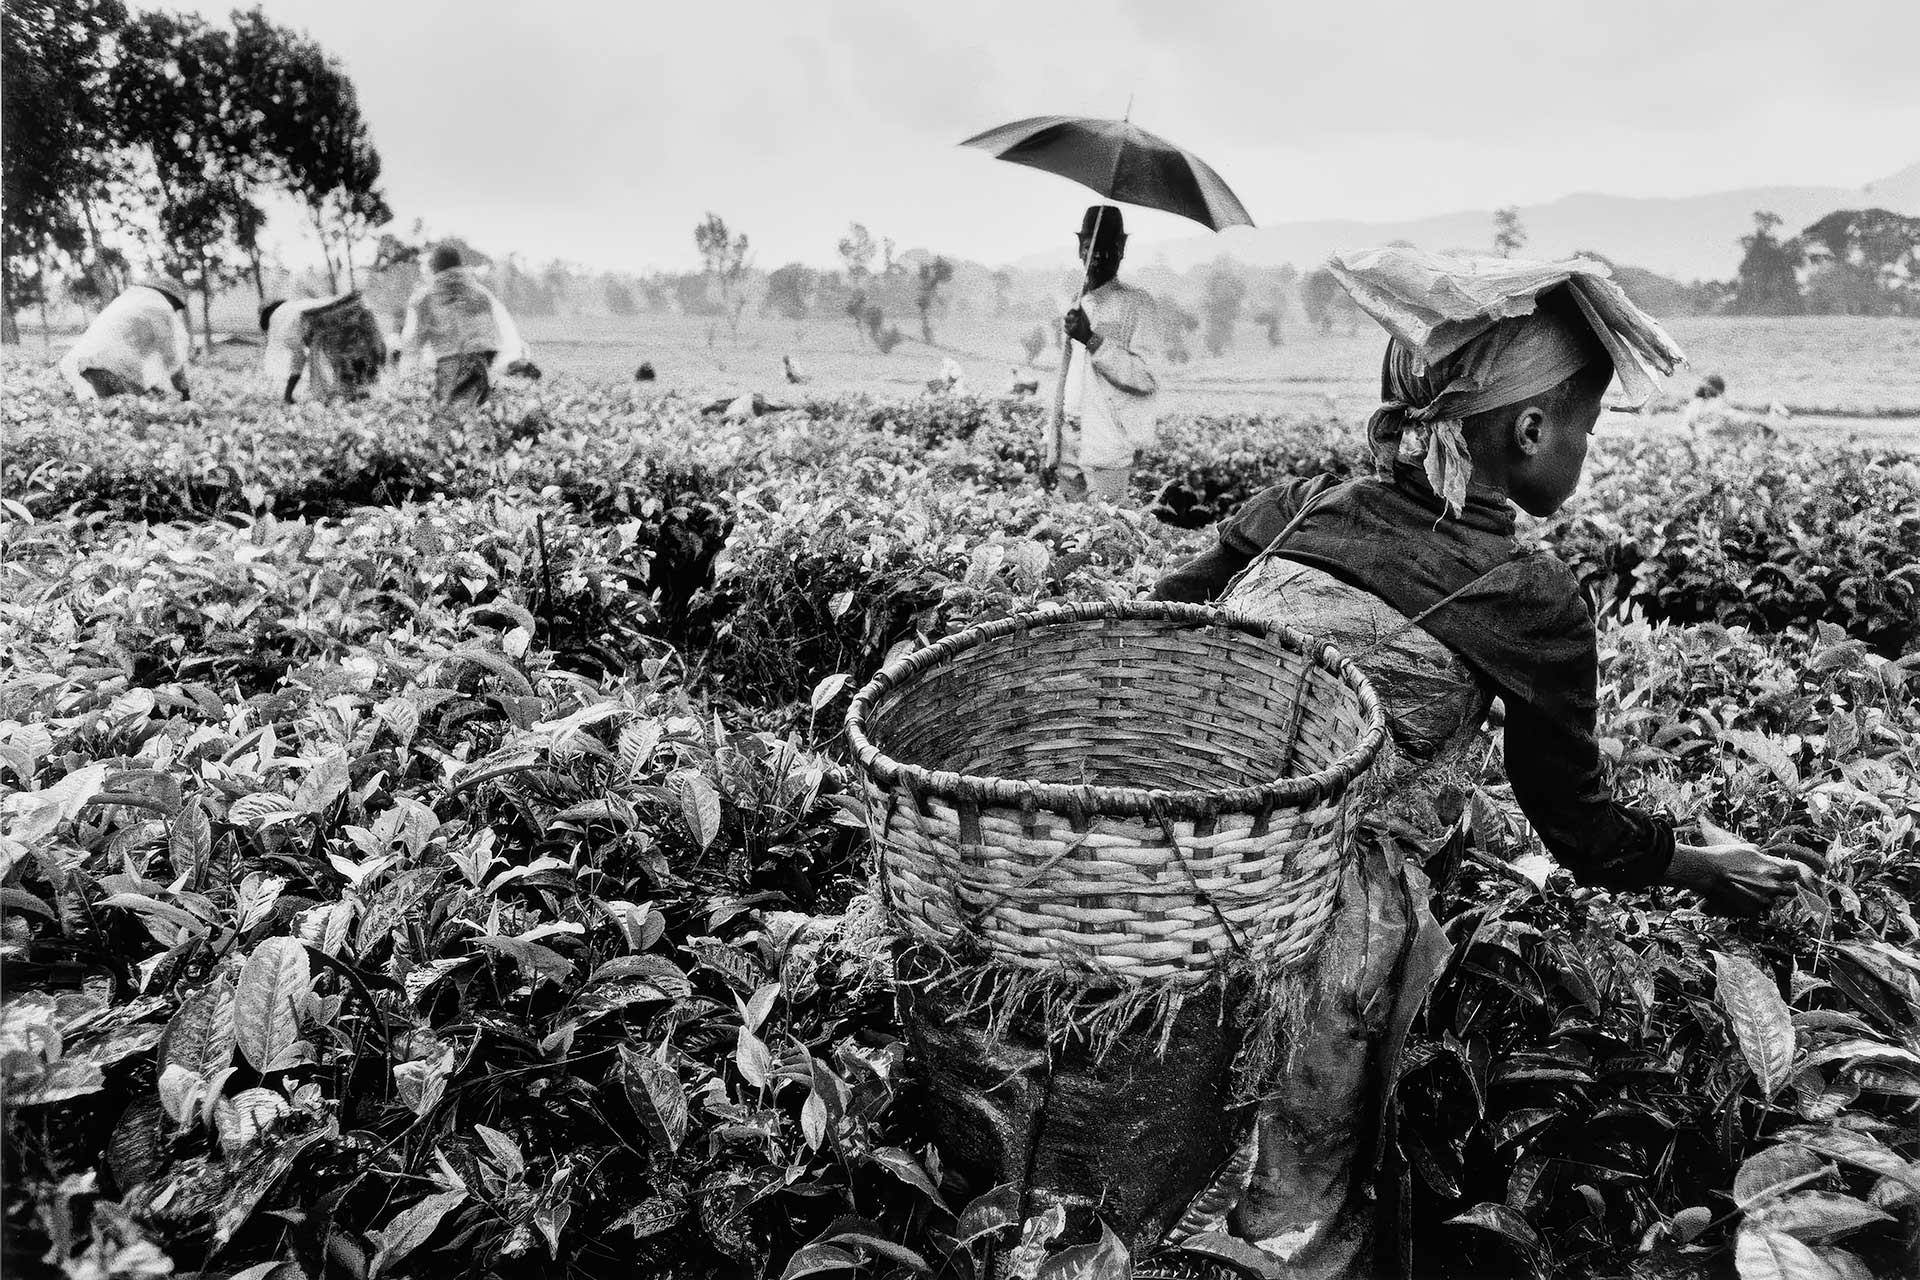
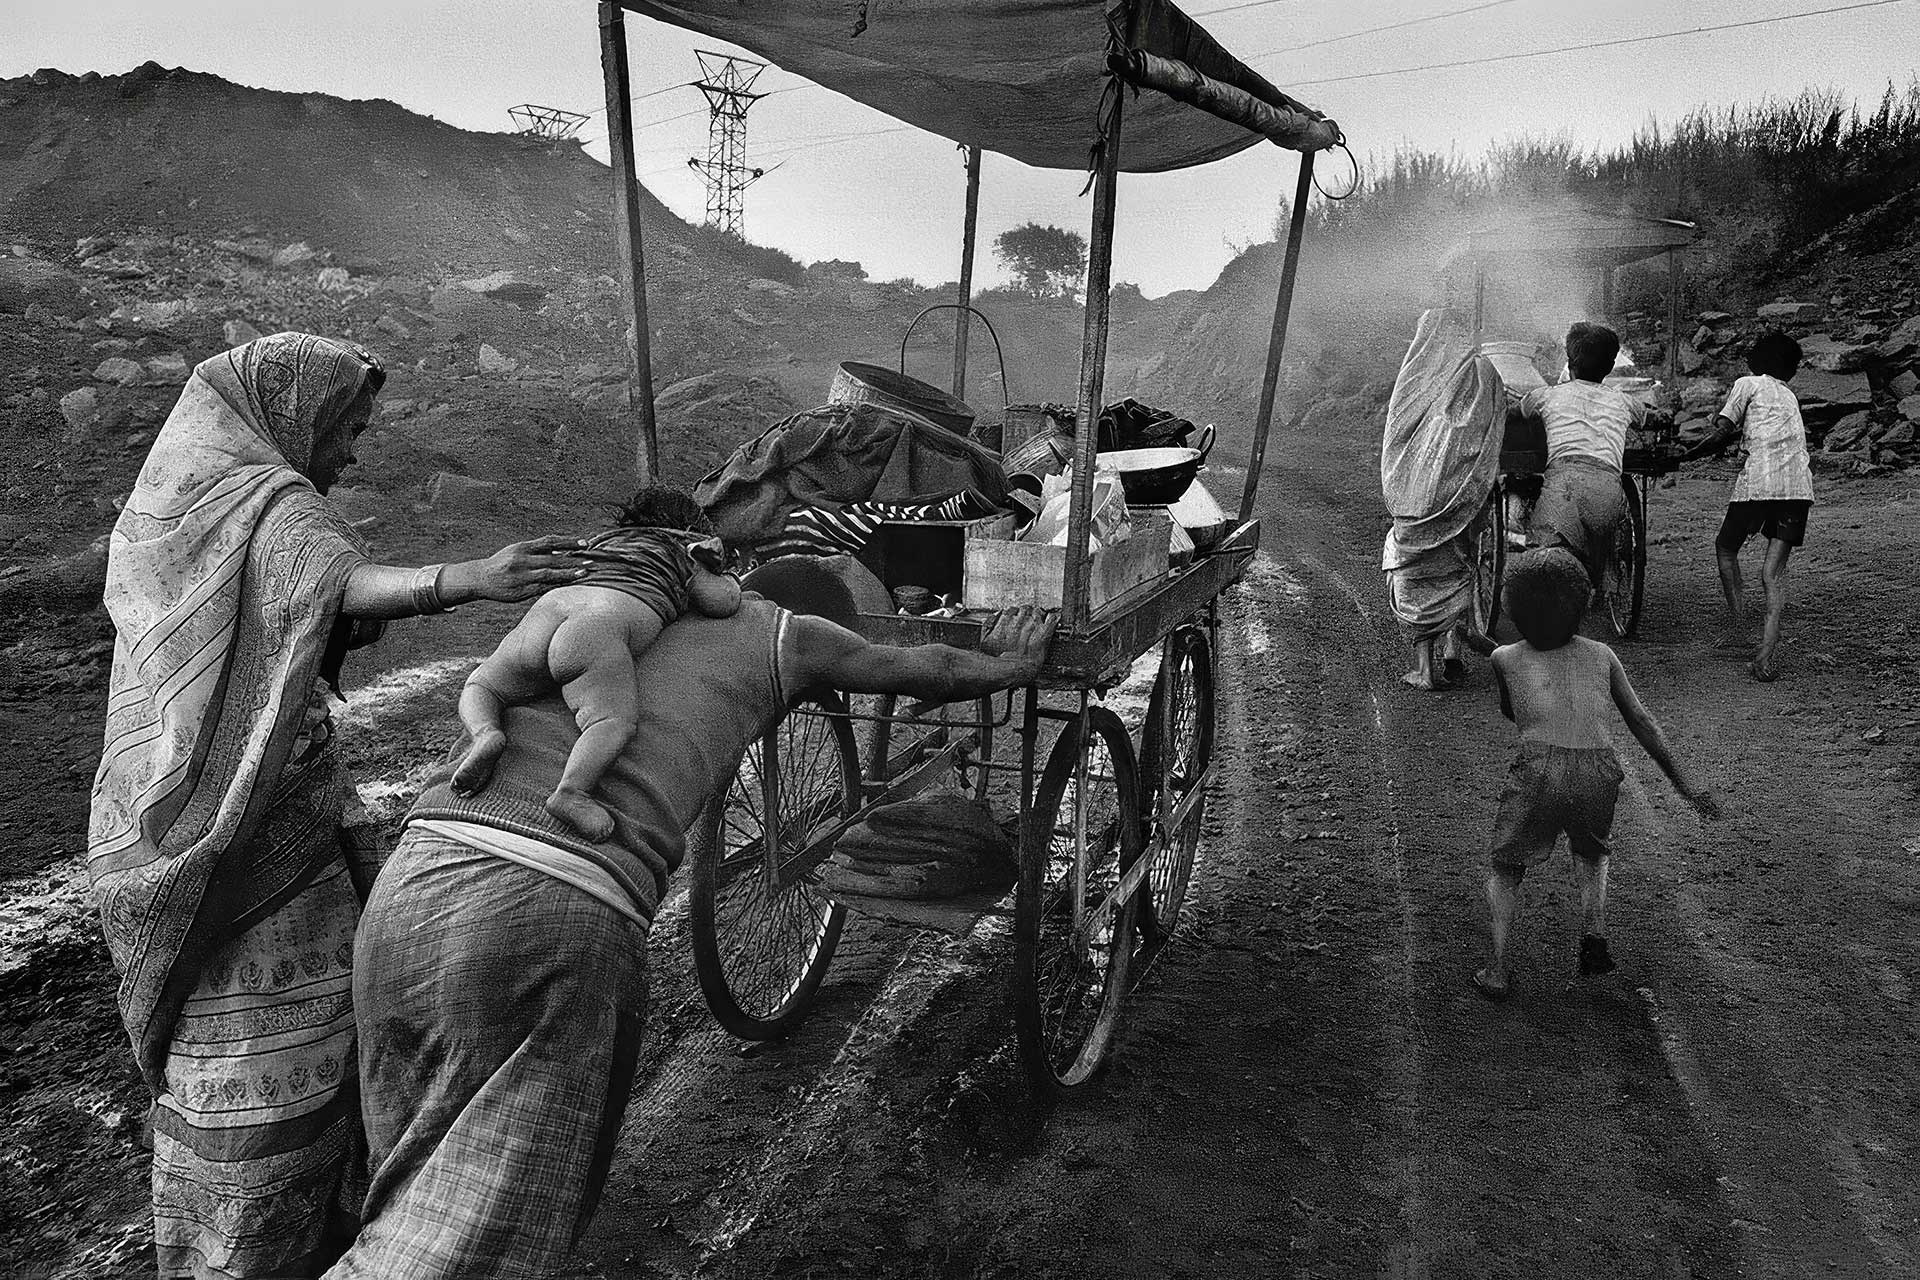
Another notable example is Sebastião Salgado’s “Workers,” which documents laborers around the world. Salgado’s images go beyond mere documentation; they tell the story of human endurance and resilience in the face of arduous work conditions. Each photograph is a chapter in the broader narrative of global labor, providing a profound commentary on the human condition.


In conclusion, transforming a collection of images into a compelling photo story can significantly enhance the impact of your work. By creating a narrative arc, capturing diverse perspectives, and maintaining a consistent style, photographers can move beyond the limitations of single images and create rich, engaging visual stories. Photo stories have the power to inform, inspire, and evoke deep emotional responses, making them a potent tool for any photographer. In the end, it is the story behind the images that breathes life into a photograph, transforming it from a fleeting moment into a lasting impression.

Craft Immersive Visual Through The Lens of Your Smartphone
In an era where our smartphones are almost always within arm’s reach, they have become our go-to tools for capturing life’s moments. Modern smartphones boast impressive camera technology, allowing us to take high-quality photos with ease. However, the key to truly stunning smartphone photography lies in understanding and leveraging the capabilities of these devices. Here are some tips and tricks to help you optimize your smartphone for capturing breathtaking photos, maintaining a formal yet engaging approach, reminiscent of National Geographic’s style.
Understanding Your Smartphone Camera
Before diving into specific techniques, it’s essential to familiarise yourself with your smartphone camera’s features and settings. Most smartphones offer a variety of modes, such as portrait, night, and panorama, each designed for different shooting conditions. Spend time exploring these modes and reading the user manual or online guides specific to your device. Knowing what your camera can do is the first step toward mastering smartphone photography.
Leverage Natural Light
Lighting is crucial in photography, and natural light is often the best source. When taking photos outdoors, try to shoot during the golden hours – the hour after sunrise and the hour before sunset. During these times, the light is soft and warm, creating beautiful, natural tones in your photos. If you’re shooting indoors, position your subject near a window to utilize the soft, diffused light.
Use Gridlines for Better Composition
One of the fundamental principles of photography is the rule of thirds. By dividing your frame into nine equal parts using two horizontal and two vertical lines, you can position your subject along these lines or at their intersections. This technique helps create balanced and visually appealing compositions. Most smartphones have a gridlines option in the camera settings, enabling you to apply this rule effortlessly.


Steady Your Shot
Blurry photos are often the result of camera shake. To minimize this, hold your smartphone with both hands and tuck your elbows close to your body for added stability. Alternatively, use a tripod or a stable surface to keep your phone steady, especially in low-light conditions where longer exposure times can amplify any movement.
Focus and Exposure Control
Smartphones typically offer touch-to-focus functionality, allowing you to tap on the screen to focus on your subject. This feature is particularly useful for creating sharp images and controlling depth of field. Additionally, most smartphones allow you to adjust exposure manually by sliding your finger up or down on the screen. Experiment with these controls to achieve the perfect balance of light and detail in your photos.
Utilize HDR Mode
High Dynamic Range (HDR) mode can be a game-changer for smartphone photography. This feature captures multiple exposures of the same scene and combines them to create a single image with enhanced details in both the shadows and highlights. HDR mode is particularly effective in high-contrast scenes, such as landscapes with bright skies and dark foregrounds. However, use it judiciously, as overuse can result in unnatural-looking images.
Experiment with Angles and Perspectives
Great photography often involves seeing the world from a different perspective. Don’t be afraid to experiment with various angles and viewpoints. Get down low to shoot from a worm’s-eye view or find an elevated position for a bird’s-eye perspective. Changing your angle can add interest and uniqueness to your photos, setting them apart from the usual eye-level shots.


Edit Your Photos
Post-processing is an integral part of modern photography. While smartphones offer built-in editing tools, consider using dedicated apps like Adobe Lightroom, Snapseed, or VSCO for more advanced editing options. These apps allow you to adjust exposure, contrast, color balance, and more, helping you refine your photos and bring your creative vision to life. Remember, the goal of editing is to enhance your images, not to over-process them. Aim for subtle adjustments that improve the overall quality while maintaining a natural look.
Clean Your Lens
It may seem obvious, but a clean lens is essential for sharp, clear photos. Our smartphones endure a lot of handling, which means the lens can easily become smudged or dirty. Make it a habit to wipe your lens with a soft, lint-free cloth before taking photos. This simple step can significantly improve the clarity and quality of your images.
Practice and Patience
Like any skill, mastering smartphone photography requires practice and patience. Take the time to experiment with different settings, techniques, and subjects. Analyze your photos critically and learn from your mistakes. Over time, you’ll develop a keen eye for composition, lighting, and detail, allowing you to capture stunning images consistently.
Conclusion
Smartphone photography offers endless possibilities for capturing the beauty of the world around us. By understanding your device, leveraging natural light, and applying fundamental photography principles, you can elevate your photos from ordinary to extraordinary. As you continue to explore and experiment, remember that the best camera is the one you have with you. Embrace the convenience and power of your smartphone, and let your creativity shine through every shot.

Reviving Renaissance Art in the Digital Age
The Renaissance, which lasted roughly from the 14th to the 17th century, is a watershed moment in European history. After the relative stagnation of the Middle Ages, there emerged a significant cultural, artistic, and intellectual rebirth. The Renaissance, marked by a revitalised interest in ancient Greece and Rome’s classical art, literature, and philosophy, fueled advances in a variety of sectors, including science, politics, and, most notably, the arts.
The title “Renaissance,” which means “rebirth,” accurately describes the core of this transformational era. During this time, the Western world witnessed the rise of a new cultural paradigm, with humanism—a philosophy emphasising the importance and agency of humans—becoming the foundation of intellectual life. This transition had a tremendous impact on the visual arts, resulting in the creation of some of the most enduring and influential masterpieces in history.
The Renaissance was characterised by a shift in the way people approached art. Painters started using techniques that emphasised realism, human emotion, and the beauty of the natural world. Linear perspective, chiaroscuro (light-shadow contrast), and anatomical correctness enabled artists to produce more lifelike and three-dimensional creations. Figures such as Leonardo da Vinci, Michelangelo, and Raphael became identified with this artistic revolution, creating masterpieces that are still recognised today.
Leonardo’s “The Last Supper” and Michelangelo’s “Sistine Chapel Ceiling” are great examples of Renaissance painters’ ability to create dynamic compositions rich in expressive figures and skillful use of light and space. Leonardo’s mastery of sfumato (a method for easing colour transitions) gave his paintings an unparalleled lifelike appearance. Michelangelo’s mastery of human anatomy allowed him to sculpt and paint the human form with incredible realism and power, as seen by his work on the Sistine Chapel ceiling and the statue of David.


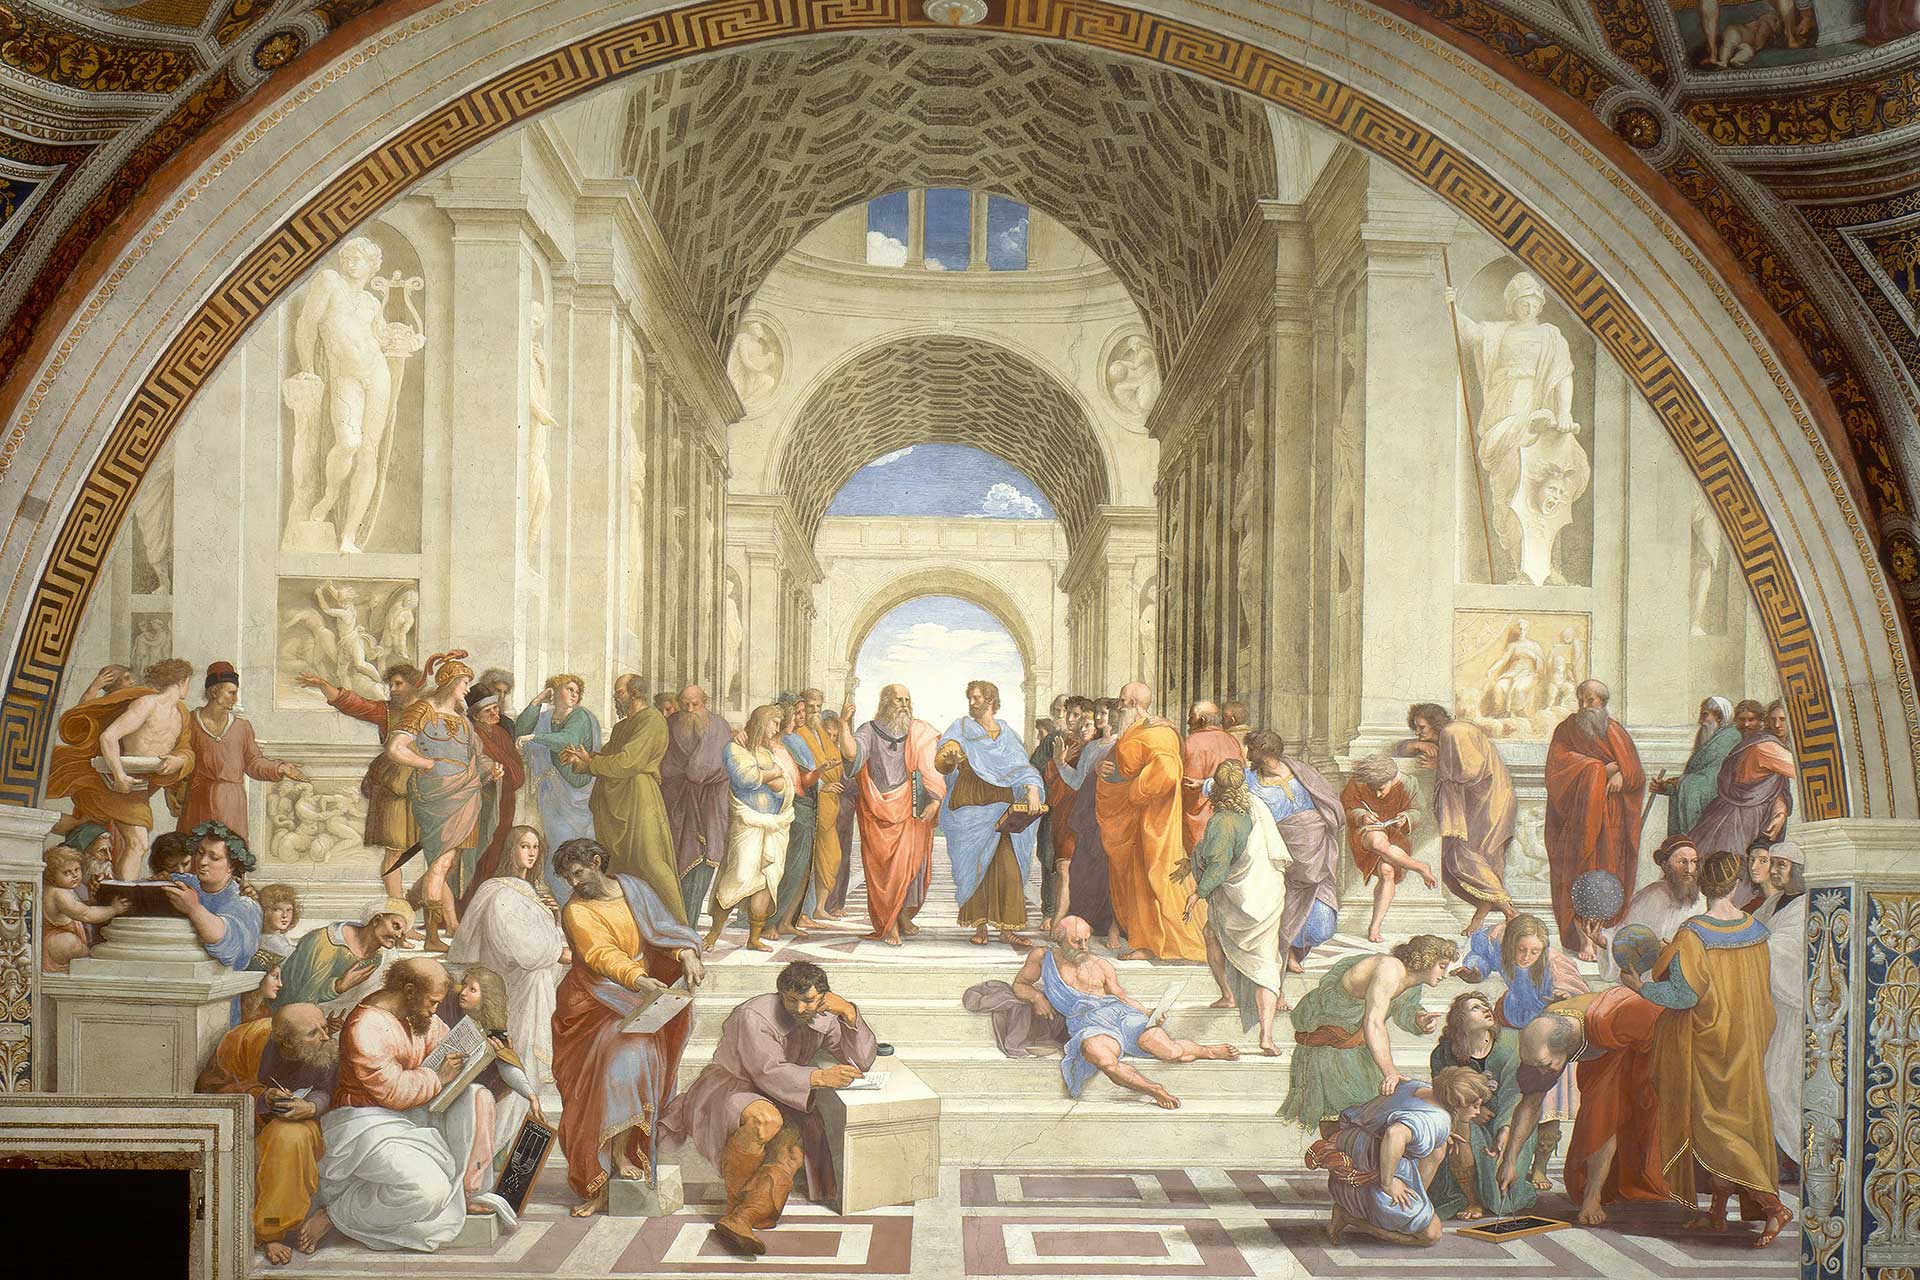
Raphael, another luminary of this era, was known for his clarity of form and ease of composition. His paintings, such as “The School of Athens,” exemplify the harmonious combination of creative skills and humanistic topics that characterise Renaissance art. These components not only distinguished Renaissance painting, but also paved the way for subsequent artistic endeavours, such as photography.
Although photography was developed centuries after the Renaissance, it owes a lot to the artistic triumphs of that time period. The Renaissance’s perfected ideas of composition, light manipulation, and perspective have become the cornerstone of photographic technology. Modern photographers frequently use these classical features to create photographs that evoke the depth and drama of Renaissance paintings.
The use of perspective, which provides the sense of depth on a flat surface, was one of the Renaissance’s most important contributions to painting and, by extension, photography. Linear perspective, first developed by Filippo Brunelleschi and later mastered by artists such as Leonardo da Vinci, enables photographers to manipulate space and depth in their photos, leading the viewer’s attention across the composition in a controlled and planned manner.
Similarly, the chiaroscuro method, which uses sharp contrasts between light and dark to create the sense of volume in three-dimensional objects and figures, is another Renaissance innovation that has had a significant impact on modern photography. This approach allows photographers to generate mood, drama, and emphasis in their photographs, increasing visual impact and storytelling power.
Contemporary photographers such as Gregory Crewdson and Annie Leibovitz have clearly used Renaissance ideals in their work. Gregory Crewdson, recognised for his cinematic and precisely produced images, frequently employs chiaroscuro to create a dramatic interplay of light and shadow, evocative of Caravaggio’s works. His works, especially those in the “Twilight” series, have a haunting, almost surreal appearance that recalls the emotional depth found in Renaissance art. Crewdson’s art frequently includes precisely constructed suburban scenes that, while founded in reality, have a surreal and mysterious atmosphere, similar to the narrative richness of Renaissance classics.
Annie Leibovitz’s classic photos frequently feature complex settings and rich colour palettes reminiscent of Renaissance compositions. Her images, whether of celebrities or historical individuals, frequently have a narrative depth and grandeur that recalls the storytelling nature of Renaissance painting. Leibovitz’s ability to construct complex, visually rich images that tell a story in a single frame is similar to the multi-layered compositions found in works by artists such as Botticelli and Titian. Her use of dramatic lighting, precise attention to detail, and careful arrangement of things within the frame all add to the Renaissance-like beauty of her work.

These and other photographers’ works demonstrate Renaissance art’s ongoing significance. Modern photographers continue to push the boundaries of their medium by incorporating Renaissance painters’ mastery of composition, light, and perspective concepts. This combination of historical techniques and modern technologies enables the creation of images that are both visually striking and profoundly emotional.
As we explore the world through a camera lens, keep in mind that past artists’ work can enlighten and inspire our creative endeavours today. The timeless principles of Renaissance painting provide a wealth of inspiration, pushing us to explore with light, composition, and storytelling in our photography. By looking back, we might find new ways to communicate our ideas in the present, creating works that have the beauty and depth of Renaissance classics.
In the age of digital photography, when technology is constantly evolving, basic creative concepts remain untouched. The Renaissance exemplifies the force of innovation and the value of combining technical skill with artistic vision. So grab your camera, study the great painters of history, and discover the limitless possibilities of creativity. Whether you are a seasoned professional or a keen amateur, the Renaissance courses can help you see the world in a new perspective and inspire you to create images that captivate the imagination and fire the soul.